I recently bought a 2011 Jeep Grand Cherokee (WK2) Laredo 4×4 w/ 5.7L Hemi. It came with the UConnect stereo, which was nice. But it didn’t have navigation and I missed Carplay. I wanted to install an aftermarket stereo, but it turned out to be pretty difficult to figure out what parts are required.
I successfully installed mine, so I thought I’d give you all a list of all of the parts you need so you can do the same. I’m not sure which other years this works for, so you’ll want to check on that. Importantly, these parts will let you use the steering wheel control buttons, the factory backup camera, and the factory amp/subwoofer (if you have them).
The parts:
Stereo: I used an ATOTO A6 PF, which I like a lot. You can use other models, but I would recommend finding one that is shallow. Some info I’ve found online suggests that you need to modify that sub-dash, but I didn’t have to do much for this stereo (more on that later).
Wiring adapter: The main adapter you need is the PAC RP4-CH11, which has a special adapter for your steering wheel controls.
Retention harness:The AXXESS Chrysler RSE Retention Harness provides the connection for the backup camera. I believe if you have rear seat entertainment screens, it might also let you connect those to your new stereo but I don’t have those and can’t confirm.
Antenna adapter:This Metra 40-EU10 adapter lets you connect the factory antenna cable to conventional coax antenna ports most aftermarket stereos.
Dash install kit: I used the Metra 95-6513B, but it didn’t fit my stereo quite right and I had to trim the plastic. Another option is the AI CDK652, but I can’t confirm if that works better or not.
Trim removal tools: You’ll need basic tools (wrenches, screwdrivers, wire strippers, etc.) for the install, but on you thing you might not have is a set of trim removal tools. These will help a lot and keep you from damaging your dash.
The install and modifications
I’m not going to cover the full process here (there are videos on YouTube), but I do want to give you some tips:
The PAC RP4-CH11 will come with two harnesses (with the gray plugs) and you only need to use one of them. If your Grand Cherokee has the subwoofer in the cargo area, then you’ll need the “B” unit. If it doesn’t, then you’ll need the “A” unit. The plugs aren’t compatible, so you shouldn’t be able to accidentally plug in the wrong one.
The PAC RP4-CH11 control unit (the blue box) has a dial to select your radio brand. This is to set the steering wheel control (SWC) buttons to the right functions. For my ATOTO stereo, I used the “other” setting. But it probably doesn’t matter, since the stereo lets you configure each button’s function in software.
There are two cables that the antenna adapter will fit in. You want the white plug, because the yellow plug is for the satellite radio antenna.
There is a cable with a small gray square plug that you disconnect from your stock stereo. You won’t connect that to anything on your new stereo. I believe it does something for the Uconnect. I mention this because I was confused about if it was supposed to go somewhere.
You’ll need to remove the metal frame inside the dash. There are three bolts that hold it in place. You can get it out by twisting it around. Replace one of the bolts for your chassis ground wires.
Some sub dash modification may be required. Online info suggests that some double-DIN stereos require substantial modification of the sub dash. But all I had to do was file down some of the plastic at the corners of the outer frame so that I could slide the new stereo.
You may need to modify the dash install kit plastic parts. My Metra kit didn’t fit the ATOTO stereo properly and I had to trim down the side with a Dremel to get it to fit.
I’ve been a big fan of Doug DeMuro since he started writing for Jalopnik and I still watch most of his videos. In a recent video, he listed all of the cars he’s owned and I was delighted to see that I’ve owned more vehicles than he has—one more, to be exact. We’re about the same age (he’s 6 months older), so it was fun to see that I’ve owned more vehicles than a famous automotive YouTuber.
To be fair, I’m saying “vehicles” because I’m including motorcycles in my list. That may be cheating, but this is all in good fun anyway. So to compete with Doug, here is a list of every vehicle I’ve owned and a brief explanation of each.
1982 Honda Nighthawk 450
I’m a high school dropout and in Georgia (where I was living at the time) they don’t let dropouts under 18 get their driver’s license until they receive a GED. I didn’t get my GED until about a year later, but I found a loophole: they do let you get a motorcycle permit. So at 16, I was able to talk my mom into letting me buy an old motorcycle to commute to work.
That motorcycle was a beat-up 1982 Honda Nighthawk 450. I think I paid around $800 for it and it was only running on one cylinder, which forced me to learn how to work on carburetors.
After I got the bike running, I took the MSF course and then hit the streets. Three days later I got in my first (and only) motorcycle accident, after a truck pulled out in front of me. I was shaken and bruised, but not badly injured. I also managed to patch up the bike on the side of the road and ride it home.
I kept the Nighthawk for a while and used it for commuting until I was able to get my GED, which let me get a regular driver’s license and my first car.
1988 Chevrolet Cavalier
Not my photo, but eerily accurate.
This was my sister’s car before it was mine and it was a piece of junk. It ran, but the AC and heater were both broken. In the Georgia summer, I soaked the seats in sweat. On my 2 hour commute to Atlanta in the winter, I had to drive covered up in blankets. At some point after taking ownership of the Cavalier, I sold the Nighthawk.
The Cavalier was giving me tons of problems, so I got a replacement (the next entry). I was going to sell the Cavalier to a coworker and let him take it home before he paid me. He never came back to work and I never got the money.
1997 Chevrolet Astro
Not my photo, but it looked the same.
This was my dad’s family van when I was a teenager. He had started working at Honda and they gave him a new Pilot, so he didn’t need the Astro anymore and gave it to me to replace the Cavalier.
I loved that van. My friend’s called it “The Monster Van” because I could pack eight people inside and still go drifting around corners thanks to the “powerful” engine and the rear-wheel drive.
But within a few months, it started having problems too. Maybe drifting wasn’t good for it… So I traded it in on a…
1976 Datsun B210
Not my photo. Looked like this, but about 50% rust
I was so excited when I saw this car on the lot, but it ended up being the worst vehicle purchase that I’ve ever made. I thought it was cool, but it was a rust bucket that was barely being held together.
At some point, the throttle cable broke and I couldn’t afford a legit repair. So I zip-tied the throttle wide open, which meant I was redlining every where I went. When I stopped at lights, I’d push the clutch in and the engine would just rev and rev until the light turned green.
The apartment complex I lived in at the time decided that the Datsun was an eyesore and had it towed. I couldn’t afford to pick it up from the tow company, so they kept it. I’m sure they ended up crushing it.
1994 Ford Escort
Not my photo, but looked the same
This car wins the award for “shortest ownership ever.” I bought it from my dad’s neighbor and it looked pretty clean. Then on the 45-minute drive home, it broke down. Turns out it had cracked heads or something.
After weeks of angry calls and threats of legal action, I was able to get my money back (but not before losing my job, because I couldn’t get to work).
1988 Toyota Corolla
Not my photo, but looked the same
After the snafu with the Ford, it took me a while to get back on my feet. But when I did, I bought this 1988 Toyota Corolla with a stick shift. It had almost 300,000 miles on it when I bought, but actually lasted for about a year and let me get to work.
Eventually, the engine blew. I have no idea what the specific problem was, because I didn’t even bother having a mechanic look at it.
2000 Kawasaki ZR-7
At this point, I decided I was done with the cycle of buying dirt-cheap cars that were going to leave me stranded on the side of the road. I knew that I couldn’t get a newer and more reliable motorcycle for a reasonable price, so I managed to talk my girlfriend (now ex-wife) into putting a 2000 Kawasaki ZR-7 on her credit card until I could pay it off.
The ZR-7 was a fantastic bike and never gave me any problems. It was my sole transportation for a while, but eventually I remembered why most people keep motorcycles as secondary vehicles. All of the practical problems add up and you realize that a car just makes more sense. So I sold the ZR-7 and bought a…
1998 Honda Accord
This was what I considered to be my first real “grown up” car. I think I paid around $5,000 for it and it looked very nice. Unfortunately, it ended up having a bad engine that cost me around $1,800 to replace. But after that, it ran like a champ and I drove for quite a while.
I used the Accord to commute to full-time day job, then to my full-time night classes at the community college where I was getting my Associate’s degree. After I graduated, I used it for a while longer to commute to my first job in my career as a mechanical designer/drafter.
1980 Suzuki GS400
It looked like this, but in pieces.
This bike was running when I bought it, but was in very rough shape. I planned to completely restore it as a cafe racer and immediately tore it apart. I repainted the frame, constructed a seat/tail piece out of fiberglass, and so on.
But I never put it back together and got bored with the project. I ended up selling it in pieces to someone and I have no idea if they ever finished it.
2004 Kawasaki ZX-6R 636
At this point, I was making decent money and decided I wanted another motorcycle—a legit supersport. I could afford to own it alongside the Accord, so practicality wasn’t a huge issue.
I found a beat-up 2004 Kawasaki ZX-6R 636 that had been laid down at least once, which had broken fairings and a dented tank. After buying it, I stripped it down and bought new fairings. A body shape pulled the dent out of the tank and painted it and the fairings a gorgeous 350Z burnt orange color.
For the life of me, I can’t remember why I ended up selling this bike, because I absolutely loved it.
1998 Jeep Cherokee (XJ)
Not my photo, but it looked pretty much exactly the same
My Accord was still running fine, but I wanted something with 4WD so I could hit the trails in the North Georgia mountains. So I sold the Accord and found this 1998 Jeep Cherokee on eBay and bought it sight unseen. It was a lift, big tires, and looked really clean.
I really liked the XJ and took it off road as much as I could. At one point, I got it stuck in a shallow pond and flooded the interior. A friend had to yank me out and I spent weeks replacing the interior carpeting to get the smell out.
Then on a camping trip in the mountains, the head gasket blew. I managed to limp it out of the woods and onto a road where a tow truck could get it, but damaged the engine even more in the process. After getting the heads machined to fix that, I decided to sell the XJ to get something more reliable.
2012 Kia Soul
Stock image. Image this, but with orange stripes (because I have awesome taste)
The 2012 Kia Soul was the first brand-new vehicle I ever purchased. Make fun of me all you want, but I liked that car. It was dirt cheap (something like $13k new), had a 6-speed manual, and a surprisingly good engine.
More importantly, it felt good having something new that I could rely on. I was also building my credit with the financing.
1990 Mazda Miata
With the Soul as my daily driver, I wanted something fun that I could use to get into autocross. The go-to at the time was the Miata. I found this first-year NA Miata for about $1,800. It had huge, ugly rims and the power brakes didn’t work.
Fixing the brakes turned out to be easy: for some reason the vacuum hose was backwards. Then I replaced the wheels and tires with the standard size. I also had to remove a cold-air intake to be able to race in the stock class at autocross.
I took that Miata to several autocross events and had a blast with it. I can’t remember why, but I then decided to sell it and that was one of my biggest car regrets. I think I sold it for $2,500, but it would be worth a lot more today.
1980 Yamaha Maxim 1100
Not my photo, but it looked like this
Around this time, my mom and step-dad moved from Georgia up to Virginia and my step-dad left his motorcycle with me. I wasn’t a cruiser guy, but the smooth power of that big engine was pretty cool.
I kept that bike for a while and only rode it occasionally, because I had other bikes at the time. I sold it after my step-dad decided that he didn’t want to ship it up to Virginia.
2007 Suzuki SV650
My roommate during these years had a first-generation SV650 and I was always a little jealous of it, so I ended up buying a 2007 Suzuki SV650.
I honestly can’t remember much about this bike, how long I kept it, or why I sold it.
2013 Subaru Outback
Stock image, but it looked like this
As much as I liked the Soul, the driver’s seat was horribly uncomfortable and was hell on my back. My then-wife and I were also getting ready to move from Georgia to Colorado and so this 2013 Subaru Outback was the obvious choice.
This was the only other vehicle that I ever bought brand new and we loved it. Sure, the CVT transmission sucked, but it could handle moderate trails and snow very well. It also got very good gas mileage.
After a couple of years, the Outback became my wife’s car and she kept it after we got divorced. Then it was stolen a couple of years after that.
1982 Jeep Wagoneer
We were living in Colorado and I decided I wanted another “fun car.” I’d always liked the look of them, so I bought this 1982 Jeep Wagoneer (renamed to the Grand Wagoneer a couple of years later) for around $1,500.
It ended up having lots of issues and left me stranded multiple times. It was also very rusty and that massive V8 was so underpowered that the thing could barely move its own weight. I sold it after a few months for about what I paid for it, but part of me wishes I had kept it considering how much they’re worth now.
2010 Nissan Xterra Off-Road
I still wanted a 4×4 for trails in the Colorado Rockies, so I gave my wife the Outback and bought a mint-condition 2010 Nissan Xterra Off-Road. I loved that Xterra. The Off-Road trim was the same as what would later become the Pro-4X and it had all the bells and whistles, including a locking rear differential.
Two hours after I bought the Xterra, I hit a deer. That left a minor dent, but I never had any issues with it. This is the vehicle that got me really into off-roading and what I owned when I went to work for EarthRoamer.
2005 Honda CBR600RR
My wife and I had bought a house and I was working at EarthRoamer. Things were going very well and we were financially secure, so I decided it was time for another motorcycle.
I found this 2005 CBR600RR with only 10k miles, which the owner managed to blow the engine during that time. I bought it as a project knowing the engine was bad, but this was a project I actually finished.
I ordered a lightly used engine and replaced it in my garage. After that, it was a champ. I used it for commuting on nice days and took it up to the twisties as much as I could.
2008 Ford Crown Victoria Police Interceptor
At this time, I was getting really into browsing industrial auctions and came across this bright-orange 2008 Ford Crown Victoria Police Interceptor. It was originally a police cruiser and then became a taxi. On a whim I bid on it and ended up buying it for around $1,200.
I had no real plans for the Crown Vic, it was just cheap and I thought it’d be fun. And it was! I had a good time beating the hell out of it and treating it like a rally car. But because I had no real use for it, I sold it. Later the city tried to fine because the buyer just abandoned it on a street somewhere without ever registering it in their name.
2006 Subaru Outback
In 2015, my wife and I got divorced. Soon after, I quit my job at EarthRoamer with the intention of starting my own fabrication business.
I decided that it would be a smart decision to sell the Xterra, buy this cheaper 2006 Subaru Outback, and put the difference into the business. I did all of that and actually really like the Outback, but it had mechanical issues (bad valves, if I remember correctly). So I didn’t keep it long and replaced it with the BMW that I’ll talk about in a moment.
1960 Chevrolet C10
My goal with my fabrication business was to design and build high-end furniture with mid-century modern aesthetics mixed with modern industrial style. For marketing, I thought it would be a good idea if my work truck was something old and cool.
I bought this 1960 Chevrolet C10 for around $5,000 and it was a true rat rod. It had a newer LS engine swap and could peel out like nobody’s business. But it was also a rust bucket and I had the bright idea to restore it.
I took it apart in my shop and kept it was an ongoing project as I attempted to run my business. I never finished it and when my business failed, I sold the C10 in pieces to someone who knew what they were doing.
2009 BMW 328xi Coupe
Yep, this was the only photo I could find of the BMW…
I needed a replacement for the Outback and my girlfriend at the time had a BMW 328i sedan that I really liked, so I bought this 2009 BMW 328xi Coupe. I thought I was very cool, because it was a sporty, luxury car. I felt rich and successful.
Unfortunately, I wasn’t actually rich or successful. My business was failing hard and I was broke. I had put all of my savings into the business and borrowed everything I could to keep it going (more details on that here, if you’re interested).
It was probably one of the worst decisions I’ve ever made, but I was overwhelmed and ended up just letting the bank repossess the BMW.
2007 Ford F-150 XL Supercab 4×4
Before my business failed, I figured I needed an actual work truck (since the Chevy was in pieces) and bought this 2007 Ford F-150 XL Supercab 4×4. It was a solid truck and I had no real complaints with it.
After my business failed, I put a truck camper in the bed and spent about 6 weeks living out of it as I drove around the country. When I got back to Denver, I continued driving it for a while.
But at that time, I didn’t have any work and decided I to begin delivering food for GrubHub to pay the bills. The gas mileage of the F-150’s V8 would have eaten all my profits, so I sold the Ford and bought a…
2012 Hyundai Accent
My reasoning was that I liked the Kia Soul and the 2012 Hyundai Accent had the same engine and transmission. The Accent treated me very well. It got incredibly good gas mileage, which helped when I was delivering food.
I kept the Accent until my mother passed away and I got money from her life insurance, some of which I used to buy a…
2002 Toyota Land Cruiser (100 Series)
This was a dream vehicle for me. I had always heard how amazing Land Cruisers were and was extremely excited to get one. I was living in Las Vegas at the time and drove to Pasadena, CA to pick up this 2002 100 Series. Other than some faded paint and worn front seats, it was in very good condition and I bought it for $9,000.
I absolutely loved that Land Cruiser and kept it for a couple years until I moved to Florida. At that time, I was freelancing and owed quite a bit of money in taxes that I didn’t have any way to pay. So in 2020, I sold it for $12,000—the first time I ever made a profit!
But this is the vehicle I regret selling more than any other. Not just because they’re worth so much more right now, but because I truly loved it and because it would have been perfect for my situation right now (more on that in a moment).
2008 Suzuki SX4
After paying my taxes with the money from the Land Cruiser, I was left with about $2,500 and needed to find something in that price range. Luckily this was just as the pandemic was starting and used car prices weren’t crazy yet. I was able to get this 2008 Suzuki SX4 hatchback with AWD and about 100k miles for like $2,200. Everything worked, including the AC (which is necessary in Florida).
Even though the SX4 was purely an “I need transportation” vehicle, I did like it. But I didn’t feel like I could rely on it for anything other than around-town driving, so I sold it the first chance I got to buy the Rav4 that I’ll talk about in a moment. But before I did that, I bought a…
2011 Triumph Speedmaster
I was into my 30s and wanted something more comfortable than a supersport motorcycle. Florida isn’t known for its twisties either, which makes cruisers desirable. Reliability issues scared me away from Harley, but I still wanted something with more character than a Japanese cruiser. I ended up finding a pretty sweet 2011 Triumph Speedmaster.
Unfortunately, I just couldn’t get over my desire for speed and adrenaline, so I sold the Speedmaster after a few months.
2019 Toyota Rav4
The Suzuki SX4 held me over for a while, but I knew I couldn’t rely on it for long. I found this almost-new 2019 Toyota Rav4 for a good price and went for it. I really liked the Rav4 and didn’t have any complaints about it. I especially liked the electric blue color—I’ll always take bright colors over silver, black, or white.
2013 Triumph Daytona 675
When I moved to Arizona, I knew I wanted another motorcycle. I wanted something fast to take to the mountain twisties and I wanted to get into doing track days. I’ve loved the Triumph Daytona 675 since it first hit the market and in particular I thought the white/blue special edition was the most beautiful bike I’d ever seen.
When I found a white/blue 2013 Triumph Daytona 675 for sale in Tucson, I jumped on it immediately. It was in great condition and the price was very fair. I loved the Daytona so much (even if it was uncomfortable) and started doing track days with it. Then a lot of things happened at once…
2001 Mitsubishi Montero Limited
My girlfriend and I had purchased a cheap pop-up camper, which we liked but knew we wanted to replace soon with a Casita molded-fiberglass travel trailer. The Rav4 was able to tow the pop-up, but didn’t have the capacity for the Casita. We decided we needed something with better towing for that.
Fortunately, because the used car market was so crazy, I was able to sell the Rav4 for $7,500 more than I paid for it. I was then able to use the difference to buy a 2001 Mitsubishi Montero Limited with great 4WD capabilities and a 5,500lb towing capacity—more than enough for the 2,800-3,500lb Casita.
But I needed transportation between selling the Rav4 and getting the check from the dealership to buy the Montero. I decided to take the Daytona 675 out of my storage unit and park it at our condo so I could use it for daily transportation. Sadly, within 36 hours someone stole the Daytona.
I was able to buy the Montero shortly after and then a month or so later Geico sent me a check for the stolen Daytona. I used that money to buy a…
2008 Buell Firebolt XB12R
This was kind of a strange choice, even for me. But I’d always had a thing for Buell motorcycles and the 2008 Buell Firebolt XB12R was priced well. The low-end torque also seemed a lot more usable on the street, compared to the super high-revving Daytona 675.
I still have the Firebolt and haven’t quite made up my mind about it. It isn’t in perfect condition and needs some work. It’s also air-cooled and only has 5 gears. But the torque is fantastic and it is much more comfortable than conventional supersports. I also like all the quirky Buell features.
For now, the plan is to keep the Buell for the foreseeable future and start taking it to the track. But knowing my history, your guess is as good as mine about how long I’ll actually keep it.
2011 Jeep Grand Cherokee (WK2) Laredo w/ 5.7L Hemi
I bought the Montero to tow the Casita, but after picking up the trailer and towing it for thousands of miles over the course of a week-long trip, my girlfriend and I decided that it wasn’t up to the job. The Casita is well under the Montero’s towing capacity, but the 3.5L V6 seriously struggled to pull the trailer. It could barely maintain 65mph on flat interstate and would overheat going up mountains. Even swapping the radiator for a new one from the later 3.8L engine didn’t help.
It was a really hard decision because I loved the Montero and enjoyed not having a car payment, but we decided we needed something that could tow better. I researched lots of potential replacements and was leaning towards an older Nissan Armada when I found out that WK2 Jeep Grand Cherokees were available with 5.7L Hemi engines that put out a whopping 360hp and 390lb-ft of torque.
That kind of power, combined with off-road capability, made me decide to buy a 2011 Jeep Grand Cherokee (WK2) Laredo 4×4 w/ 5.7L Hemi. It has the Quadra-Trac II and Selec-Trac systems, which make it very good off-road (even without diff locks). I’ve owned the Grand Cherokee for less than a week, but have already tested its off-road abilities on some pretty serious trails here in Arizona. It also tows our Casita easily.
Summary
And now we’re caught up …at least for now. I haven’t owned exotics like Dough DeMuro, but I’d say my variety is right up their with his. If you actually read this whole thing, I applaud you! This was mostly for me, as I have a hard time remembering every vehicle I’ve owned. For my own records, I’ll try to keep this list updated whenever I get a new vehicle.
All of the trailer hitch options currently available for third generation Mitsubishi Monteros/Pajeros reduce ground clearance below the bumper by quite a lot. The Montero’s departure angle is already less than ideal, so making it worse with a trailer hitch is unacceptable. Still, some of us need to tow.
Modified Curt trailer hitch for 3rd gen Monteros
To help the situation, I modified a new Curt trailer hitch for my 3rd gen Montero. This gained me about 2.5 inches of ground clearance below the receiver tube, with the tube tucked up just below the bumper. In this guide, I’ll explain how you can perform a similar modification.
Disclaimer: I am not responsible if you hurt yourself performing this modification, if you waste your money ruining the hitch, or if it falls apart and causes your trailer to come off and kill a family in a minivan behind you on the highway. This requires proper welding and you shouldn’t attempt it if you don’t have a lot of welding experience.
Other people have done similar modifications, but some go about it in different ways. I chose to do what I felt was the simplest method: cutting the crossbar off of the upright mounts, then rewelding it 2.5″ higher up. This illustrates the basic idea:
Montero trailer hitch modification
The idea is straightforward. If you’re an experienced fabricator, you can probably figure out how to do it properly just by looking at that illustration. But I’ll go ahead and explain the whole process for people who want the full story and who want to avoid mistakes.
(may need) 3-4″ inch square 3/16″ mild steel plate
Everything linked to above (aside from the hitch itself) is just a suggestion. If you prefer other brands, go ahead and use them.
I won’t get into the specifics of the welding here, because I can’t teach anyone how to weld properly in a short article like this. But you should be prepared for MIG welding on mild steel. Obviously your hitch needs to handle pulling the weight of a trailer, so it needs strong welds. This is not the time to try your hand at welding for the first time! Hire a pro if you need to.
Measurements
Before even looking at your cut-off wheels, you need to take thorough measurements. Later, when you weld the hitch back together, you will need to reference these measurements in order to make sure the hitch will actually bolt onto your truck. If you’re off by even 1/8″ in some places, it may not fit anymore.
A few things to note that should help:
The two upright supports are parallel to each other, and perpendicular to the cross bar.
The distance between the top of the upright supports (where the bolt holes are) to the top of the cross bar is equal on both sides.
The cross bar does not need to move forward or backward at all, nor does it need to tilt. It just needs to move straight up by 2.5″.
I recommend that you take the following measurements, at bare minimum:
Distance between upright supports (most important)
Distance from top of upright supports to top of cross bar
Forward/backward position of cross bar on the upright supports
It is also very helpful to use your speed square and your marker to draw guidelines before you start cutting. Those lines will be very helpful when you do your welding. If nothing else, draw vertical lines from the cross bar up.
Cut the original welds
Put a cut-off wheel on your angle grinder, take a deep breath, and then start cutting.
You want to cut through the welds on the four edges at each end of the cross bar (where the red lines are in the diagram above). Do your best not to cut into the upright supports at all, as that could weaken them. Just cut the welds and through the cross bar tube as close to the upright supports as you can get.
If you have a good angle grinder, the entire cutting process should only take 5-10 minutes. This is thick metal, but cut-off wheels will chew through anything if the angle grinder has enough power.
After the upright supports are off, switch to flap discs and sand down the welds on the upright supports until they are nice and smooth. Also remove the paint where you will be welding.
Smooth down the cross bar ends, as well. Try to keep the edges even, so the cross bar will be easier to weld perpendicular to the upright supports. Again, remove the paint where you will be welding.
If you want, you can use your cut-off wheels to trim off the bottom ends of the upright supports. I didn’t do so, as they are at the outsides by the tires and don’t hang any lower than the receiver tube. But if the excess length bothers you, you can trim it off.
Spacers
While cutting through the welds, you will have inevitably removed some material from the cross bar, which shortened it. If you don’t compensate for that, the overall width will be too short and your bolt holes won’t line up.
You can compensate for the shortened cross bar in one of two ways: leave a small gap when welding, or add more material.
This is where your measurements come in. If the length of your cross bar is now more than 1/8″ shorter than the original distance measurement between upright supports, then you will need to add material. If it isn’t, then you can get away with a small gap.
In my case, my cross bar was about 0.35″ shorter than it needed to be. So I purchased two 3/16″ thick mild steel plates to act as spacers.
I wouldn’t recommend plates any thinner than 1/8″, though. If need be, you can use a space on one side and not the other. This will mean that your receiver tube is very slightly off center, but that shouldn’t have a negative effect (as far as I know).
Welding
Other than ensuring that you are getting solid welds, the most important thing here is to ensure that the upright supports are perfectly perpendicular to the cross tube and that they are the proper distance apart.
Triple check your measurements, use your marker for positioning lines, and make good use of your speed square.
When you’re positive that everything is lined up properly, tack weld the upright supports to your cross tube. Then measure everything again. If it is still good, then finish up your welds. Follow standard techniques to avoid heat warping. If you’re using spacers, make sure they’re solidly welded to both your cross tube and your upright supports.
Once everything is cool, check your measurements one more time.
Cleaning up
As with any other welding, you can use your flap discs to clean up your welds and any spatter, if you want to. Just don’t weaken your welds by grinding them down too much.
Then use something like degreaser or plain isopropyl alcohol to wipe the whole hitch down clean.
Finally, use your spray paint in a few thin coats to cover any bare metal. I found that a standard gloss black enamel from Ace Hardware matched pretty well, but use whatever you prefer. You won’t be able to see it, so this is mostly for rust protection.
Install
After the paint dries, you can follow the standard Curt installation instructions. Yes, the bolt behind the rear AC compressor sucks. No, there isn’t any real trick to it. Just be patient.
With this modded hitch, you will either need to remove the plastic fascia under the bumper entirely or cut an opening in it for the receiver tube. I just removed it, since I can’t think of any reason to bother keeping it.
That’s it! Now you can tow without hurting your departure angle much. The receiver tube should hang down roughly the same amount as the exhaust pipe tip, so you this is about as good as it gets for departure angle.
Have any tips? Maybe a better way of doing this? Comment below!
Third generation Mitsubishi Montero/Pajero models with leather seats have a very common wear point: the left side of the driver’s seat. Every Montero I’ve seen either has a tear in that spot or has already had it repaired. Professional reupholstery will look fantastic, but costs hundreds of dollars. In this guide, I’ll explain how you can repair this common tear on a budget.
Montero seat upholstery repair
Supplies
To perform this repair, you will need the following:
For the new vinyl (or “pleather”), I recommend going to a local fabric store. Take off your headrest and bring it with you inside the store, so you can find vinyl that matches well. You can order vinyl online, but you’ll spend more money and it will be much harder to find a good match.
Buy a lot more vinyl than you actually need. If it comes in yard-wide rolls, then buy at least a foot in length. This will give you lots of material to work with if you mess things up and should still cost less than $10.
Preparation
As you can see in the photos, I did my repair with the seat out of the vehicle. I did that because I bought an entirely new seat from a pick-and-pull junk yard and hadn’t yet installed it. You do not need to remove your seat to do this, though it may make it slightly easier to work with. If you do remove the seat, it is just four bolts/nuts and the power seat connections holding it in place.
Start by using a diluted degreaser and a clean towel to thoroughly clean the upholstery around the tear. You need to remove all of the dirt and grime in order for the vinyl adhesive to stick well later.
If there is any lose, crumbling foam padding, then you should remove the bits that are coming off. The idea is to get a clean starting point.
Cut a clean rectangle around the tear, then remove lose/crumbling foam.
In that same vein, use your scissors or knife to cut a rectangle around the tear. You want straight, clean edges instead of the jagged natural tear. Don’t remove more material than necessary. Just enough that you have a straight-edged rectangle.
The repair
Using your new vinyl material, cut two rectangles of material. The first (inner) rectangle should be about an inch larger than the opening on the seat, on all sides. That inch will give you plenty of surface area for the glue.
Cut a rectangle of your new vinyl so that it overlaps by about one inch
Your second (outer) rectangle of new material will probably be a little larger than that. This is what will be visible, so try to make it so the edges will line up with seams in the original upholstery. As you can see, my outer rectangle isn’t actually a rectangle at all. The bottom edge has a substantial curve to it. That was to hide the edges as much as possible.
Get your glue ready, then carefully put the inner rectangle inside the seat (under the original upholstery). Smooth it out as much as you can, so it isn’t bunching up. Then apply glue to that inch overlap. You don’t need a lot of glue, but enough that the whole overlapping surface gets coverage.
While the glue is still wet, adjust the new material placement if necessary. Avoid getting any glue on the outer surfaces of the upholstery. Give the glue 20-30 minutes to set.
After gluing the new inner vinyl in place, make sure your new outer vinyl will line up well
Double-check to make sure your outer patch material will lay nicely, then cover its back side with a thin layer of glue. Immediately place the patch over both the original upholstery and the new inner material. As the glue dries, smooth out the outer patch so there are no wrinkles.
Make sure all edges of the new vinyl are firmly glued down. Excess glue won’t be very visible after drying, but try to keep it to a minimum.
When that glue dries, go back and makes sure all of the edges of the outer patch are flush and that you don’t have any edges pulling up. If you do, use a small amount of glue to keep the outer edges done.
That’s it!
Finished upholstery repair
As you can see, mine turned out pretty well. It is visible, but it is only noticeable if you are looking for it. Even when you do see it, it looks decent.
I’ve had mine done for a few weeks now and haven’t noticed any issues. It hasn’t peeled or anything.
This is a cheap repair, but it still looks a million times better than a tear with foam visible.
I recently wrote a how-to guide on multi-color resin 3D printing. As soon as I saw that that technique was a success, I knew I wanted to try it with different material types as well.
There are several kinds of photosensitive resin available for 3D printing, which mimic different kinds of engineering plastics. For instance, you might have seen some labeled as “ABS-like.” But for this proof of concept, I wanted wildly different kinds of resins, so I chose a flexible resin and a standard rigid resin.
You can use pretty much any rigid resin you like, but the stuff linked above is what I used here. There aren’t as many flexible resin options on the market. Siraya Tech’s Tenacious is probably the most well-known, but I used 3DMaterials’ SuperFast SuperFlex resin and was very impressed with it. It printed well on my ELEGOO Saturn 2 and was quite flexible.
The idea
As with the multi-color resin 3D printing technique, the idea here is to print an object in your primary material first. In my case, that was the flexible resin. That object should have modeled-in cavities that you can then fill with your secondary resin (the rigid resin).
When you shine a 405nm UV flashlight on the liquid resin you just poured in, it will cure and harden. It will also fuse to the original print. Theoretically, you could fill several different cavities with different resin colors and materials. The result is a multi-material print.
Multi-material resin 3D printing
Obviously, this does have some restrictions. Namely, your model needs to have accessible cavities for your secondary resin. This will limit the geometry you can print, but I think this technique could still be very useful.
The steps
My original guide on multi-color resin 3D printing goes into far more detail on each step, but I’ll cover the basics again here.
First, print your object using flexible filament.
Then, using a blunt syringe, fill the cavities with your rigid filament.
Use the UV flashlight to cure the new resin.
Refill and cure again until the cavities are full.
With filament-based 3D printing, you can get multiple colors with additional extruders, manually swapping filament, or with something like a Mosaic Palette device. But one of the disadvantages of resin 3D printing is that it is very difficult to change colors during a print.
In this article, I’ll walk you through a technique that lets you get multiple colors in a resin print and that is easy to do. Redditor u/ChinchillaWafers suggested this technique in this post and I decided to give it a try. It worked quite well, so I’m sharing it with you all.
Supplies
To do this, you’ll need the following supplies in addition to your printer:
You can use as many resin colors as you like, but I suggest using colors that contrast well. Gray on white, for example, won’t show up very well. But black on white will.
The idea
The idea here is to leave debossed letters or other spaces in your printed model, such as text inset into a surface. You can then fill those with your contrasting liquid resin and use the UV flashlight to cure it.
A 405nm UV flashlight will cure liquid resin just like your MSLA resin 3D printer does. Other UV wavelengths might work, but these resins are meant to cure with 405nm, so it is best to stick to that.
Because you’re pouring liquid resin into cavities in your print, you need to make sure you model can be physically oriented so that those cavities are level. Otherwise, it will be hard to keep the resin from spilling over the edges before it cures and hardens.
The steps
Step 1:
Start by printing your model like you normally would. For my test, I printed a simple sign with debossed lettering that says “Cameron & Maria” (me and my girlfriend). I printed this in white so that most other colors would contrast well.
Step 2:
Remove supports, then rinse and cure your part. You can also finish curing the part after adding the contrasting resin, but I chose to cure it first since I would be handling the part.
Step 3:
After putting on gloves, choose a contrasting resin color (or multiple colors) and pour it into a small, disposable container. Paint cups work well for this. You could try to pull the resin directly from the bottle, but it would be difficult to reach your syringe inside.
Step 4:
Make sure your print is level, then carefully fill a syringe with contrasting resin. Try to pick a syringe needle size that is a bit smaller than the smallest portion of the debossed letters.
Then very slowly squeeze the syringe to fill your letters with the contrasting resin. You can either do all of your letters at once or do them one at a time (curing each before starting the next).
I recommend doing them all at once in order to avoid yellowing the original print with too much UV exposure. You can see at the top left (by the “C”) that I made that mistake when I first started.
Step 5:
If any resin spilled over the edges, use an paper towel wetted with IPA to wipe it away. Try not to soak up the resin inside the lettering.
Step 6:
Turn on your UV flashlight and shine it over the lettering to cure the new resin. Depending on the depth of the lettering (mine was 2mm), curing can take anywhere from 3-15 seconds.
Safety warning: 405nm UV light is bad for you! Avoid shining it at anything living, especially your eyes! Seriously, I take no responsibility if you blind yourself or develop skin cancer.
Step 7:
Repeat steps 4-6 until your letters are completely filled in. If you end up with spilled-over resin that cured, you can lightly sand the surface to remove it.
Admire your work
And that’s it, you’re done! This is an easy, affordable way to add more color to your resin prints. It works especially well for debossed lettering, so I will almost certainly use it in the future for projects where I want to add a name/logo to enclosures.
It seems like it might also be possible to mix materials, such as a flexible resin with a rigid resin. I’m hoping to experiment with that in the future.
When we bought our pop-up camper (a 2007 Fleetwood Sedona), we knew that we wanted to go off-grid. We have no interest in camping in parking lots surrounded by others people.
But we live in Arizona and have two dogs, which means that AC is a necessity. We considered solar setups, but I’ve done that in the past and wasn’t satisfied. Solar panels are expensive and you need a lot of them to power AC. You’re also limited by the available sunlight, which is hard to predict.
We decided a generator would be the best option for us, but there are many on the market to choose from. In this article, I’ll explain why we chose the generator we did and give my thoughts on how we like it so far.
Choosing a generator
The first step when selecting a generator is to determine how much power you’ll need in watts. We had to potentially provide enough power for:
Air conditioning (13,500 BTU unit)
12V system charging (for interior lighting and propane furnace blower/ignition)
A corded drill for the lift mechanism (more on this in another article)
Phone charging and another miscellaneous stuff
We wouldn’t need to use any of those simultaneously, which meant that we just had to accommodate the most power-hungry item: the AC unit. That uses around 1,400 watts while running, so we needed at least that much.
Generators have two specifications: surge watts and running watts. In our case, we needed at least 1,400 running watts. Theoretically, the AC unit could draw as much as 6,500 surge watts while starting, but we haven’t found this to be an issue.
It is tempting to just get a large, high-output generator like this one. Models like that are quite reasonably priced. But they’re also large, very heavy, and use a lot more fuel. We have limited space in our camper and wanted to keep fuel consumption as low as possible, to reduce the amount of fuel we had to bring with us.
The WEN 56235i inverter generator
Ultimately, we settled on the WEN 56235i inverter generator (rated at 1,900 running watts) It is a portable model with a built-in carry handle that is quite compact and fuel-efficient. It weighs just 39 pounds, compared to 104 pounds for the Westinghouse WGen3600DFv. It was also pretty affordable.
The WEN 56235i is not a dual-fuel model, which means it only runs on gas. We would have liked the option to use propane too, but the dual-fuel models in this form factor are much more expensive. On the plus side, the WEN 56235i is very efficient. Wen claims that its 1-gallon fuel tank will last for seven hours at half-load.
We haven’t yet tested the real world fuel consumption, but I estimate that the fuel tank will last around 5 hours while we run the AC. With the generator’s tank full and an additional 5-gallon gas can, that gives us 30 hours of runtime. We could run it nonstop from 11am-6pm everyday (keeping the dogs cool) and get four full days of use before needing more gasoline.
Opinions
My only real complaint about the WEN 56235i generator is that it is fairly loud. It might not be any louder than other generators, but it is still loud enough to be a nuisance. This isn’t a major issue for us, as we have no reason to run it at night and don’t camp near other people, but it is still something you should be aware of.
Startup is very easy (make sure nothing is connected to the generator when starting!) and the engine runs smoothly. You do have to ensure that it has oil, because this isn’t a car engine and it will burn oil. We bought a handful of bottles of oil to keep in our camper so we could top it off when needed.
The available power outlets work well for us. There are USB ports for charging our phones and other gadgets. There is a 12V DC receptacle if you need it (we haven’t had a use for it). And there are two 120V 20A outlets, which is what we use for the camper via this adapter.
One nice feature of the WEN 56235i generator is the “Eco-Mode” switch. Flipping this switch will allow the generator to adjust itself to suit power draw. In the manual, Wen says to only use Eco-Mode if you’re drawing less than 1,000 watts, so it doesn’t help with the AC. But it is great for saving fuel when all you need to do is charge a phone or something.
The power switch also has a handy feature that lets you cut off the fuel supply while the generator is still running. This burns off the fuel in the carburetor, which should keep it from getting junked up and therefore extend the generator’s service life.
Finally, there are connections that let you daisy chain generators together to increase the power output. We don’t have any plans to use that feature, but it is a nice option if we ever wanted to get a second generator to power our home in an emergency situation.
Conclusions
There are lots of similar generators on the market and I can’t tell you if this is the best one. But I can tell you that we’re very happy with our purchase. I chose this model because I’ve always liked Wen’s tools and the price was right. Plus, I’m a sucker for the color scheme (don’t judge me).
I would absolutely recommend the WEN 56235i generator to anyone in a situation similar to ours. It provides a little more power than we need, but it is still compact, easy to carry, and fuel-efficient. In my book, that makes it perfect for boondocking in a pop-up camper.
If we ever run into any issues with our generator, I will update this page.
While I’ve been riding motorcycles for more than 16 years now, I didn’t go to the track until I bought my Daytona 675 this year. A big part of the reason that I waited so long was that it seemed intimidating. I was overwhelmed by what I needed to do and buy, which held me back.
Now that I have a couple of trackdays under my belt, I know that it is actually pretty easy to get started. To help others get on the track, I want to explain what you need for your first motorcycle trackday.
Bike prep
This should be obvious, but you should make sure your bike is well-maintained and in good working order before you do anything else. Your trackday organizers will inspect your bike and they won’t let you on the track if there is anything wrong with your bike. Things to check include:
Fork seals are clean and not leaking
Chain and sprockets are clean, lubed properly, and not overly worn
Foot pegs are secure and pivot properly (if applicable)
Throttle closes smoothly and easily
Brake and clutch levers operate properly and cables aren’t loose
Shifter moves freely
Brake pedal has proper resistance and doesn’t bind
Your suspension and tires should also be in good shape. If you are in need of new tires or need your suspension setup for your weight, there should be techs at the track who can do the work at competitive rates. It cost me $40 to have a tech setup my suspension at the track and tire prices were the same (or better) than at local shops. The techs can also recommend tire pressures for your bike and the current conditions.
Assuming that your bike is in good shape, there are only a few things you need to do before you get on the track. These vary by track and trackday organization, but usually you need to:
Cover all lights with blue painters tape
Either remove mirrors or cover the glass in painters tape
Install a dB killer for your exhaust, if necessary
Many tracks have decibel limits and your exhaust can’t exceed those limits. Even popular aftermarket slip-ons can be too loud. Unless you have a stock exhaust, there you may need to install a dB killer to stay below the limit.
Some exhaust manufacturers sell dB killers/baffles specifically for their products, which should be your first choice. If those aren’t available for your exhaust, you can try a universal dB killer like this one.
Riding gear
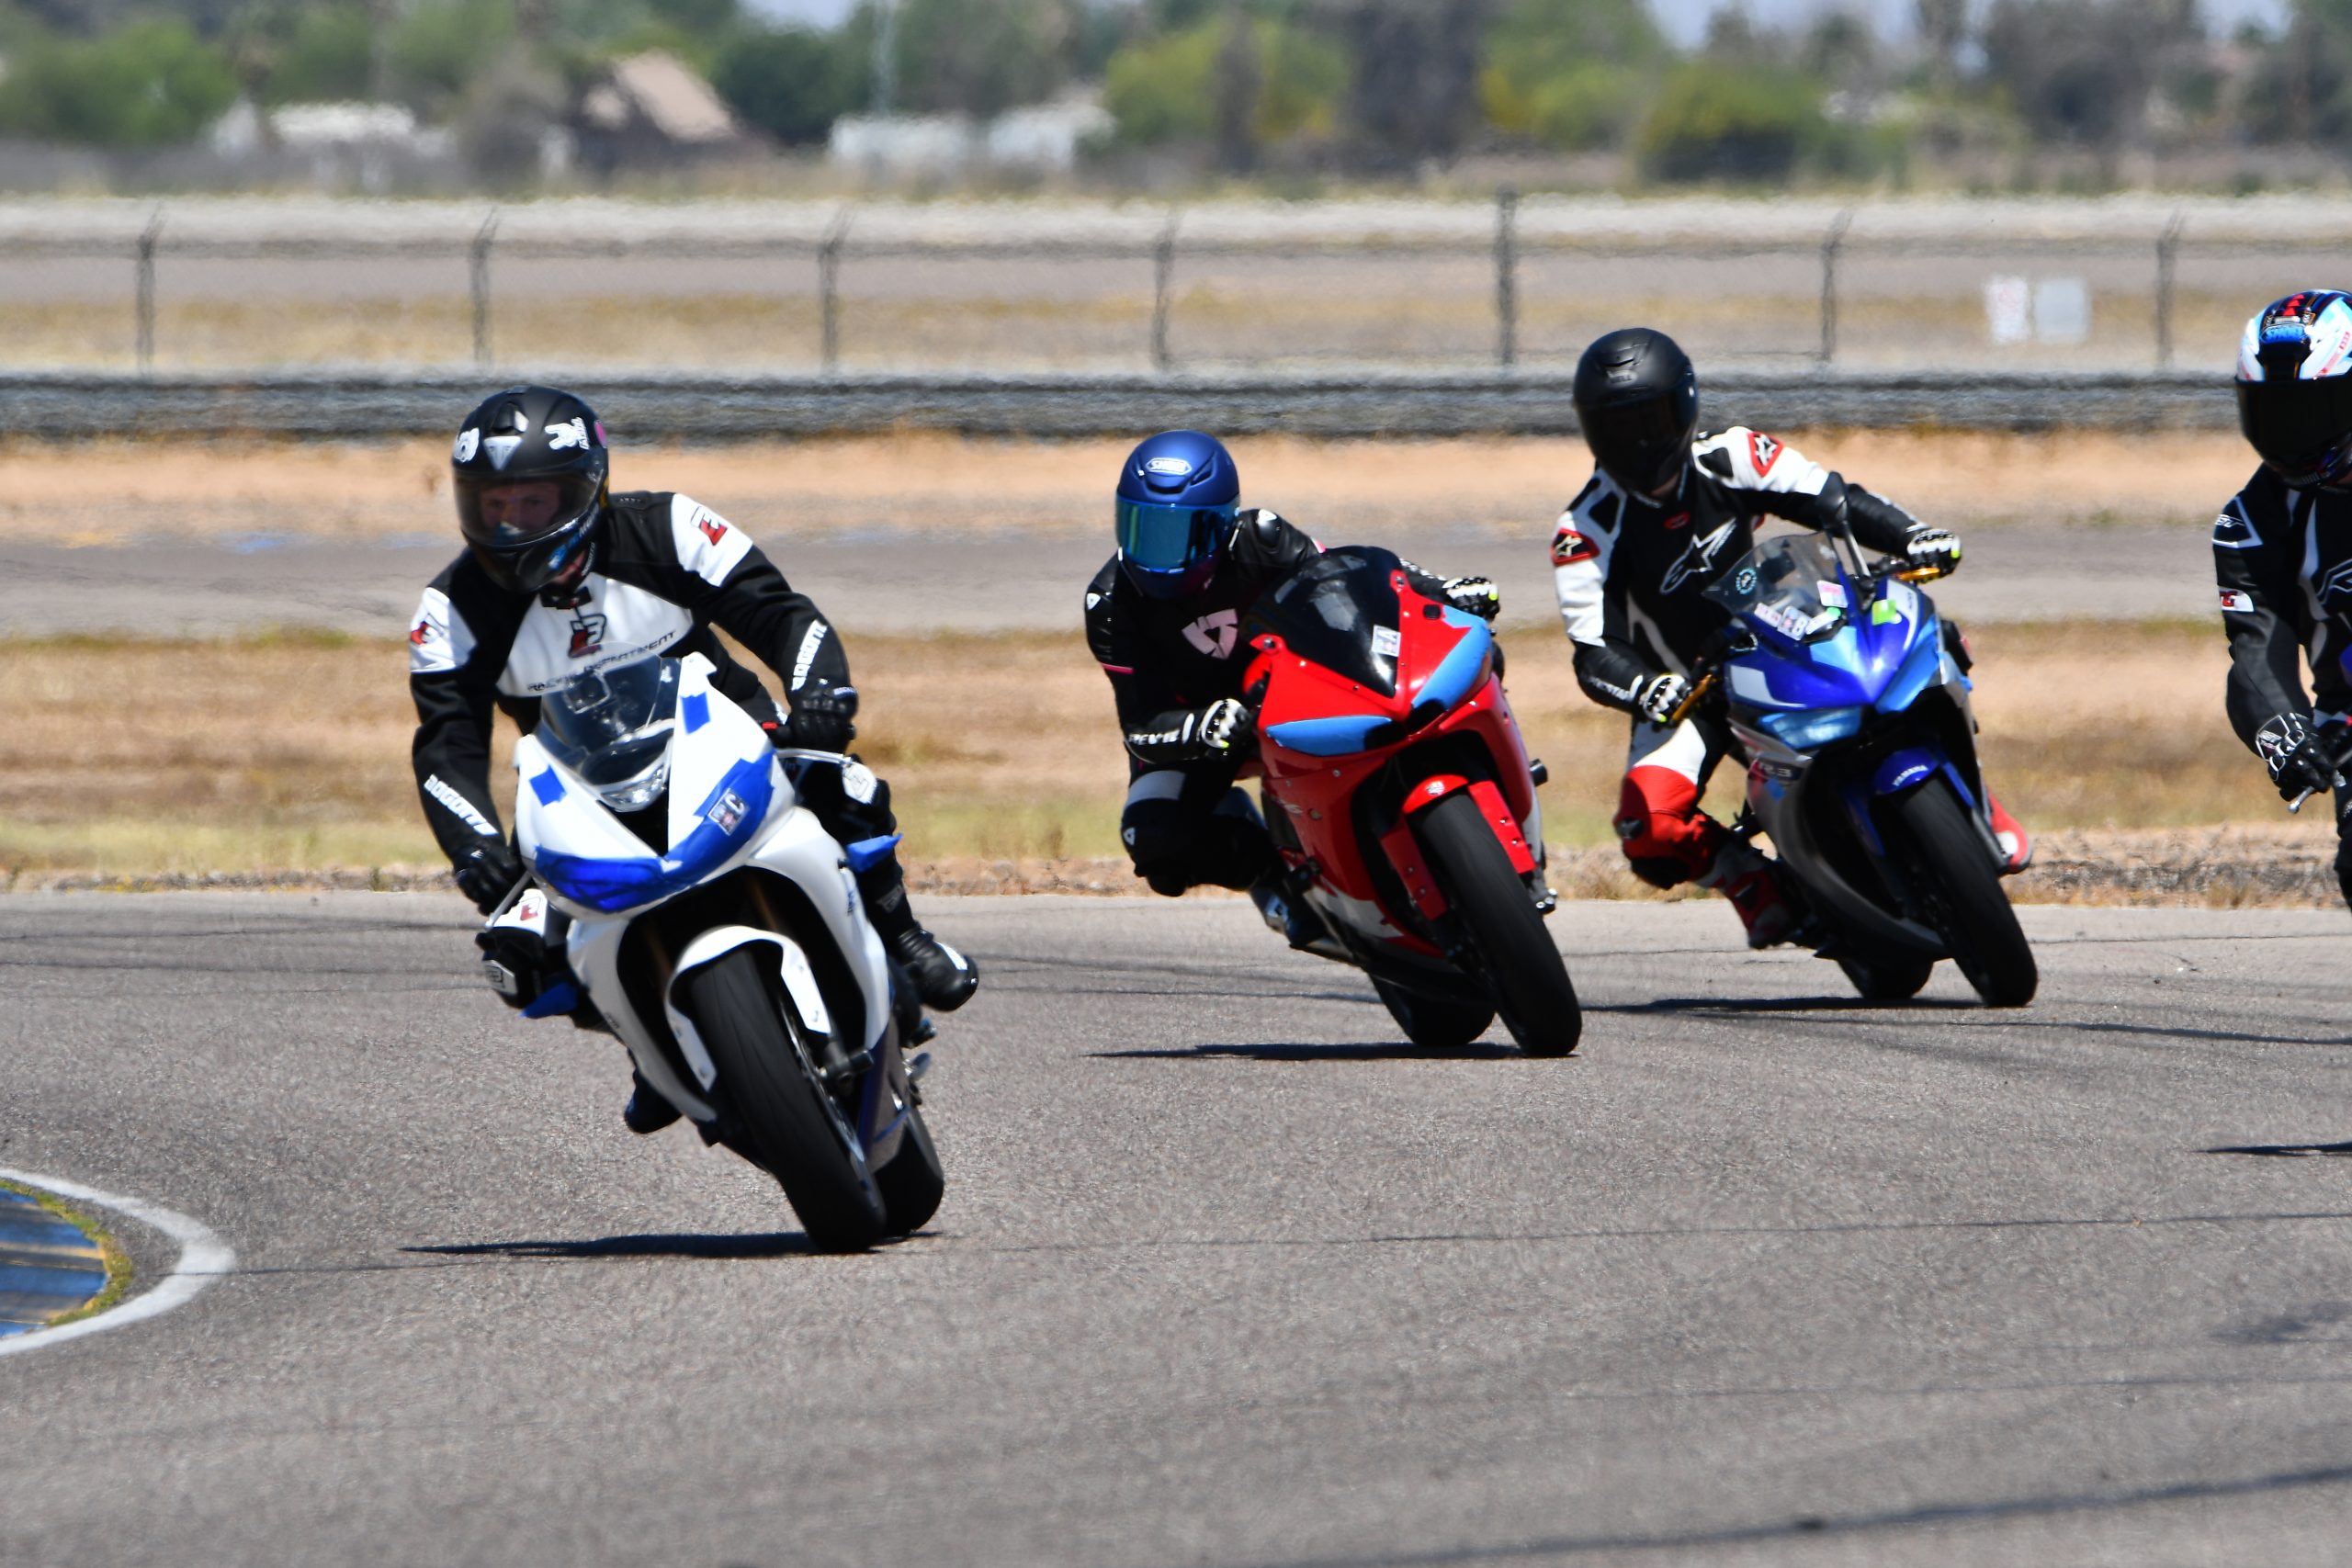
Every respectable trackday organization will have gear requirements. Your textile jacket for street riding will not cut it. At the very least, you will need:
A DOT-approved helmet
Riding suit (leathers)
Over-the-ankle riding boots
Gauntlet gloves
Riding suits can be made from a variety of leather types, including cow hide, kangaroo hide, and goat hide. Cow hide is always acceptable, but the others may not be (check with your organization). Similarly, a one-piece suit is always acceptable, but a two-piece may or may not be. If you are going to buy a two-piece suit, make sure the top zips onto the bottom.
Your suit may come with knee pucks (sliders) and a back protector, or you may need to order them separately. Whether or not they’re required will depend on the organization, but you should buy them either way.
Wearing my inexpensive Bogotto Losail riding suit
Suits can be very expensive and that cost tends to be what keeps people from going to the track. But a riding suit will literally save your skin and decent suit will last for years. I ordered my suit (a Bogotto Losail) from FC-Moto in Germany for around $300, which is about the cheapest suit on the market. But it is still cowhide and seems to be constructed well.
And whether you’re in cold weather or hot weather, base layers will increase your comfort. Under Armor-style leggings and shirts are great at wicking away sweat and keeping your from sticking to your leathers. The cheap brands are generally just as good as the expensive brands, so there is no need to spend a lot of money.
Tools and supplies
To be on the safe side, you should bring a basic set of tools with you. Those should include ratchets and sockets, hex wrenches, pliers, and so on. You don’t need to bring your entire garage with you, but you want to be able to handle basic tasks if they come up.
You will also want to bring an air compressor and some means to power it. I use this air compressor that plugs into my car’s cigarette outlet. With this, I can inflate or deflate the tires to maintain the pressures recommended by the techs. Keep in mind that your tire pressures will change throughout the day as it gets hotter.
Depending on the track and the size of your bike’s gas tank, you might also need to bring a jerry can full of fuel. My Daytona 675 has a relatively large tank that lasts the entire day, but I have friends who need to refuel multiple times during the day.
Shade and comfort
You’re only going to be on the track for a fraction of each hour. The rest of the time, you will want somewhere comfortable to rest. The track might not have any amenities aside from some porta-johns, so you will want to bring a few things. This is especially true if you’re somewhere hot, like I am in Arizona.
The most important thing is some shade. I use an E-Z Up Ambassador portable canopy. It’s heavy, but provides 10×10 feet of shade and is quick to setup/breakdown. To keep it from blowing away in the wind, you’ll want some sandbags to put on the feet. I just bought some bags and sand at my local Ace Hardware.
Bring your own shade, because the track may not have any!
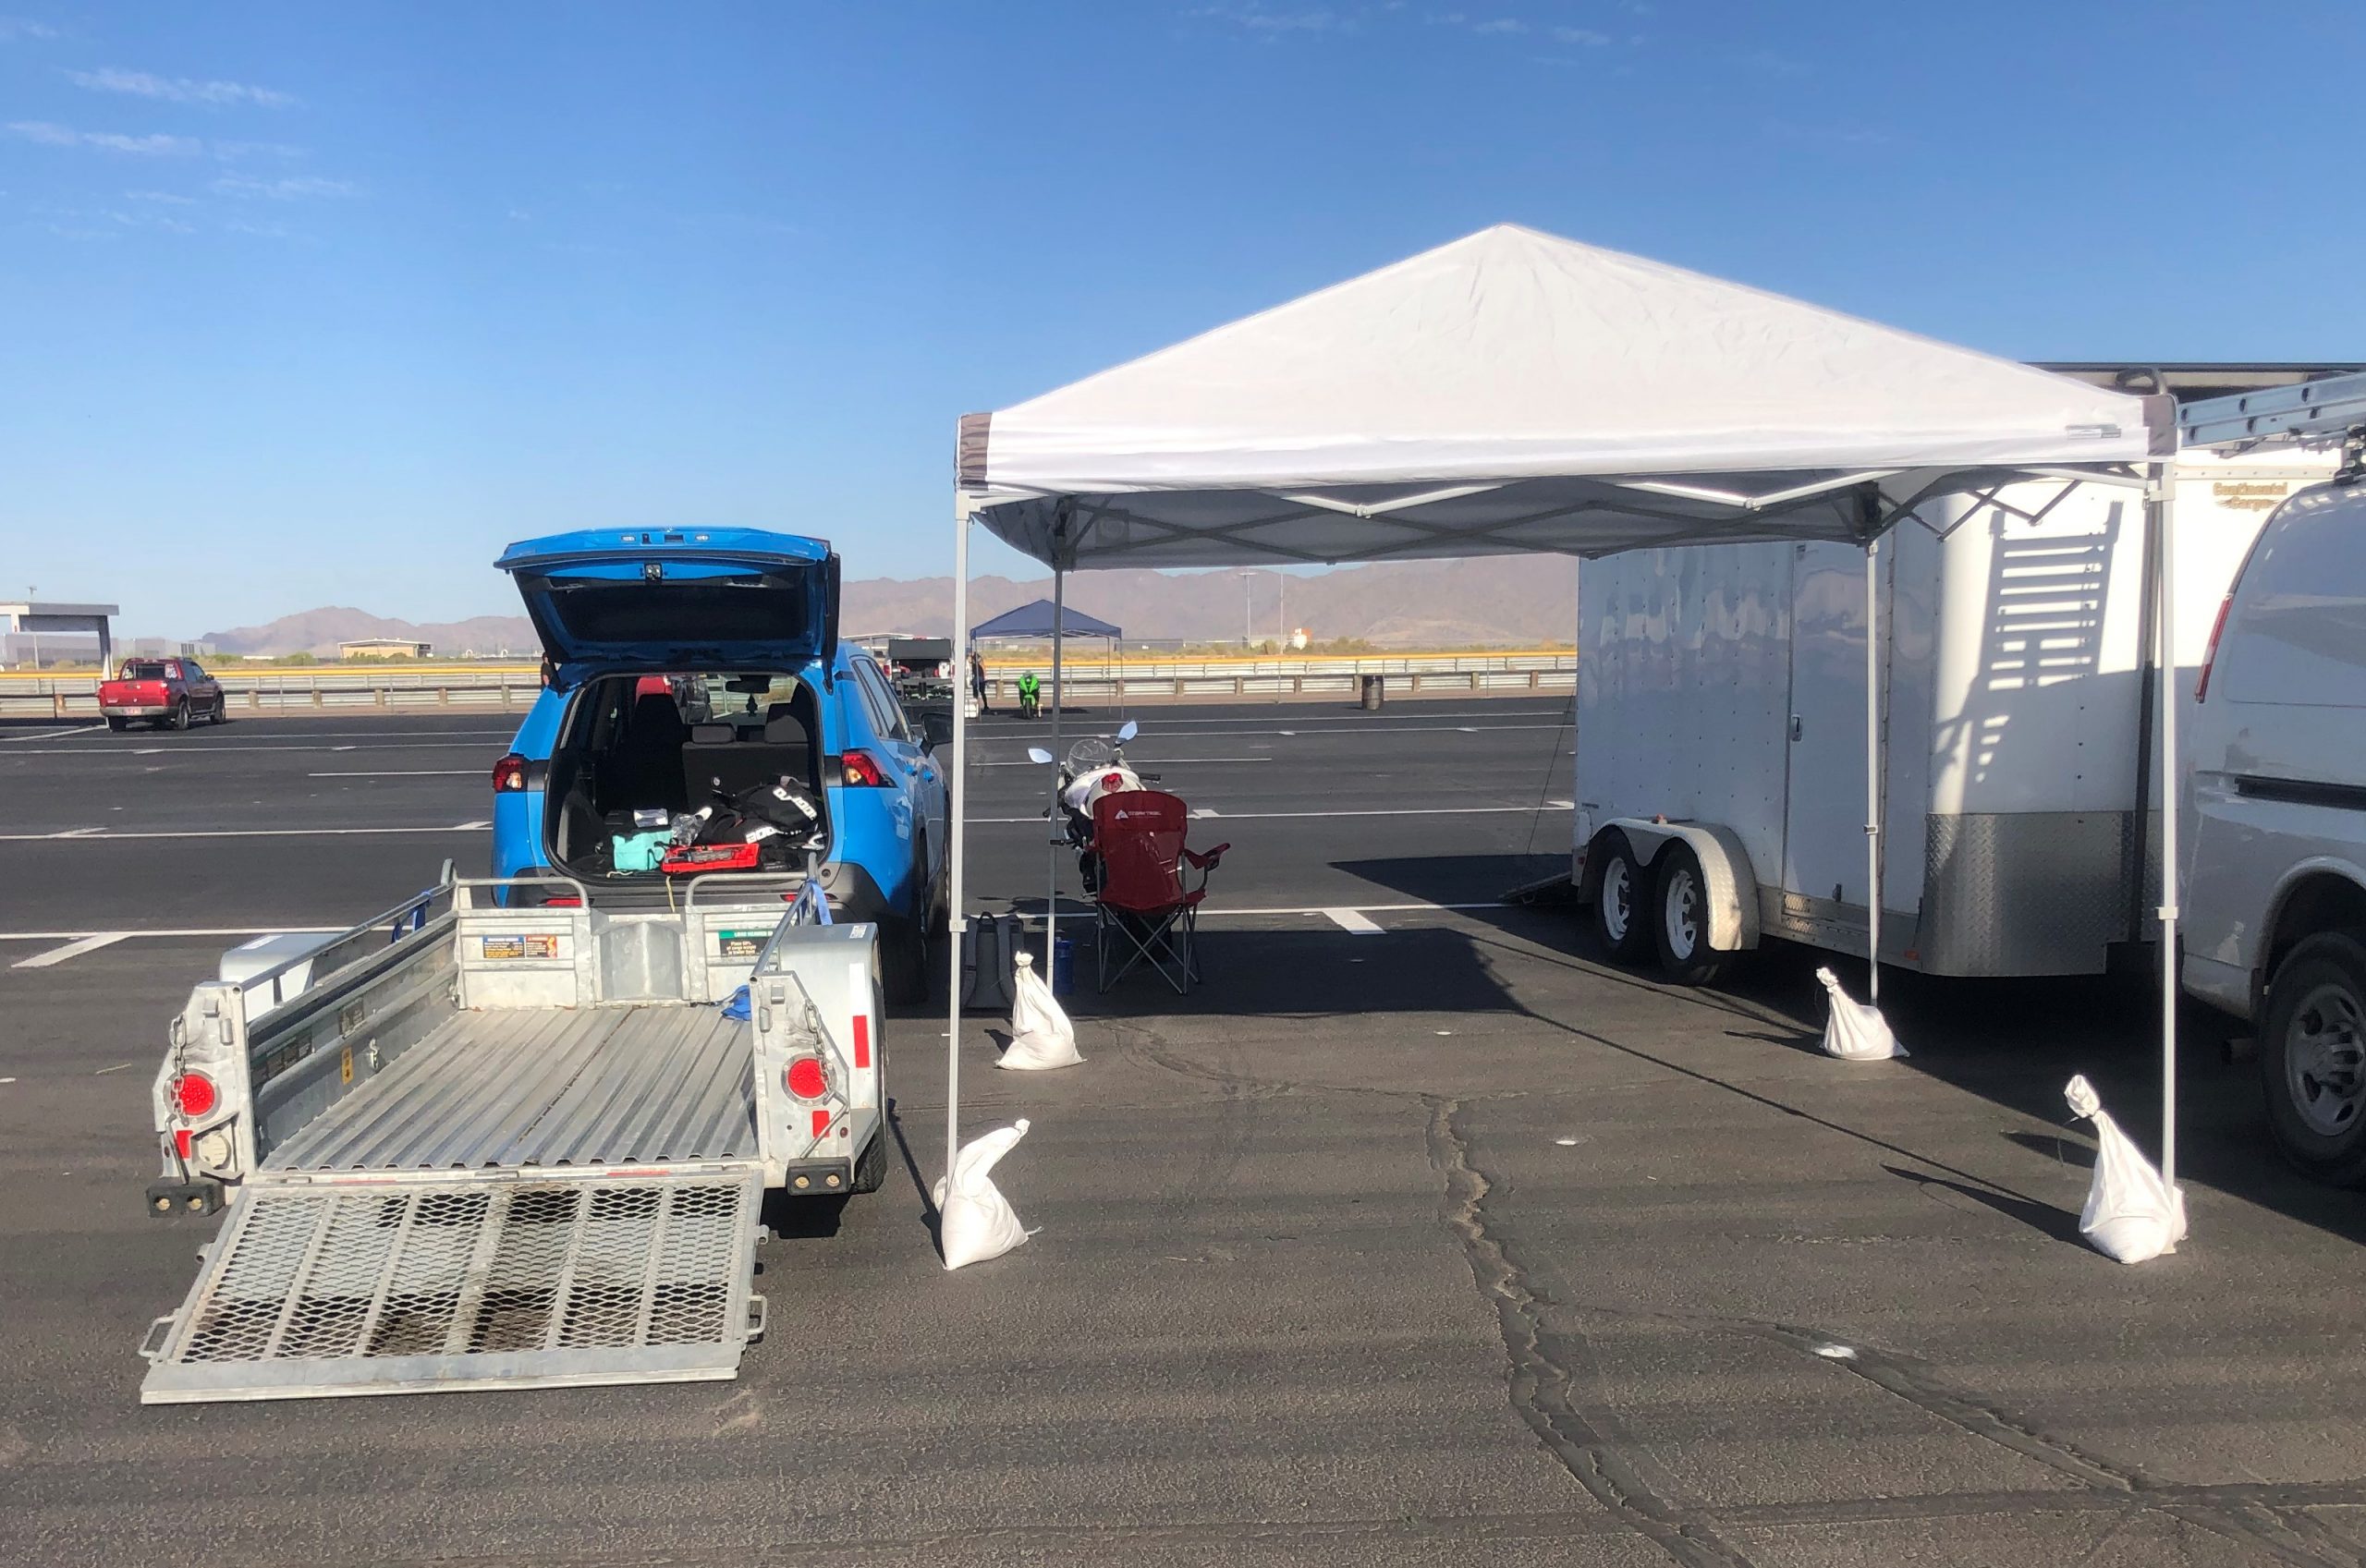
You’ll also want something to sit on in the shade. Regular old collapsing camping chairs work just fine for me.
It’s optional, but you might want a folding table on which to place your helmet, gloves, etc. between track sessions.
Finally if you want some real comfort, you might consider a portable swamp cooler (with generator for power). I have friends who brought one to our most recent trackday and it really helped with the 105°F+ heat.
Hydration and food
I can not stress enough how important hydration is at the track. However much you think you’ll drink, double or triple it. I’m talking about gallons of water and/or sports drinks. Even if you aren’t in hot a desert like I am, the physical exertion of riding hard while in leathers will drain you.
You should start hydrating several days before you go to the track. Avoid booze and drink as much water as you can stand each day.
Then bring as much fluid as you can with you to the track. A few bottles of Gatorade will not be enough. I would recommend a few gallons of water for each person, at a minimum. You can buy electrolyte packets to mix in with your water (I use Liquid I.V.), which can help a lot. Make sure you have a cooler and ice to keep your water from getting hot.
You will also want food for the track. While you might not have much of an appetite, you should have lunch and snacks ready. Bananas are great, as the potassium can help with cramps. Sugary candy can also help to keep your blood sugar up.
Getting your bike to the track
You can simply ride your bike to the track, but not many people do. That would make it very difficult to bring everything mentioned above. I can also guarantee that the last thing you’ll want to do after a long, hot day at the track is hope back on your bike for a ride home.
For those reasons, you’ll probably want to tow your bike to the track. In the United States, U-Haul is a great place to rent motorcycle trailers. It usually costs me about $35 for a two-day rental, which lets me load the bike up the day before the trackday and then return the trailer the day after.
My Daytona 675 ready to go to the track
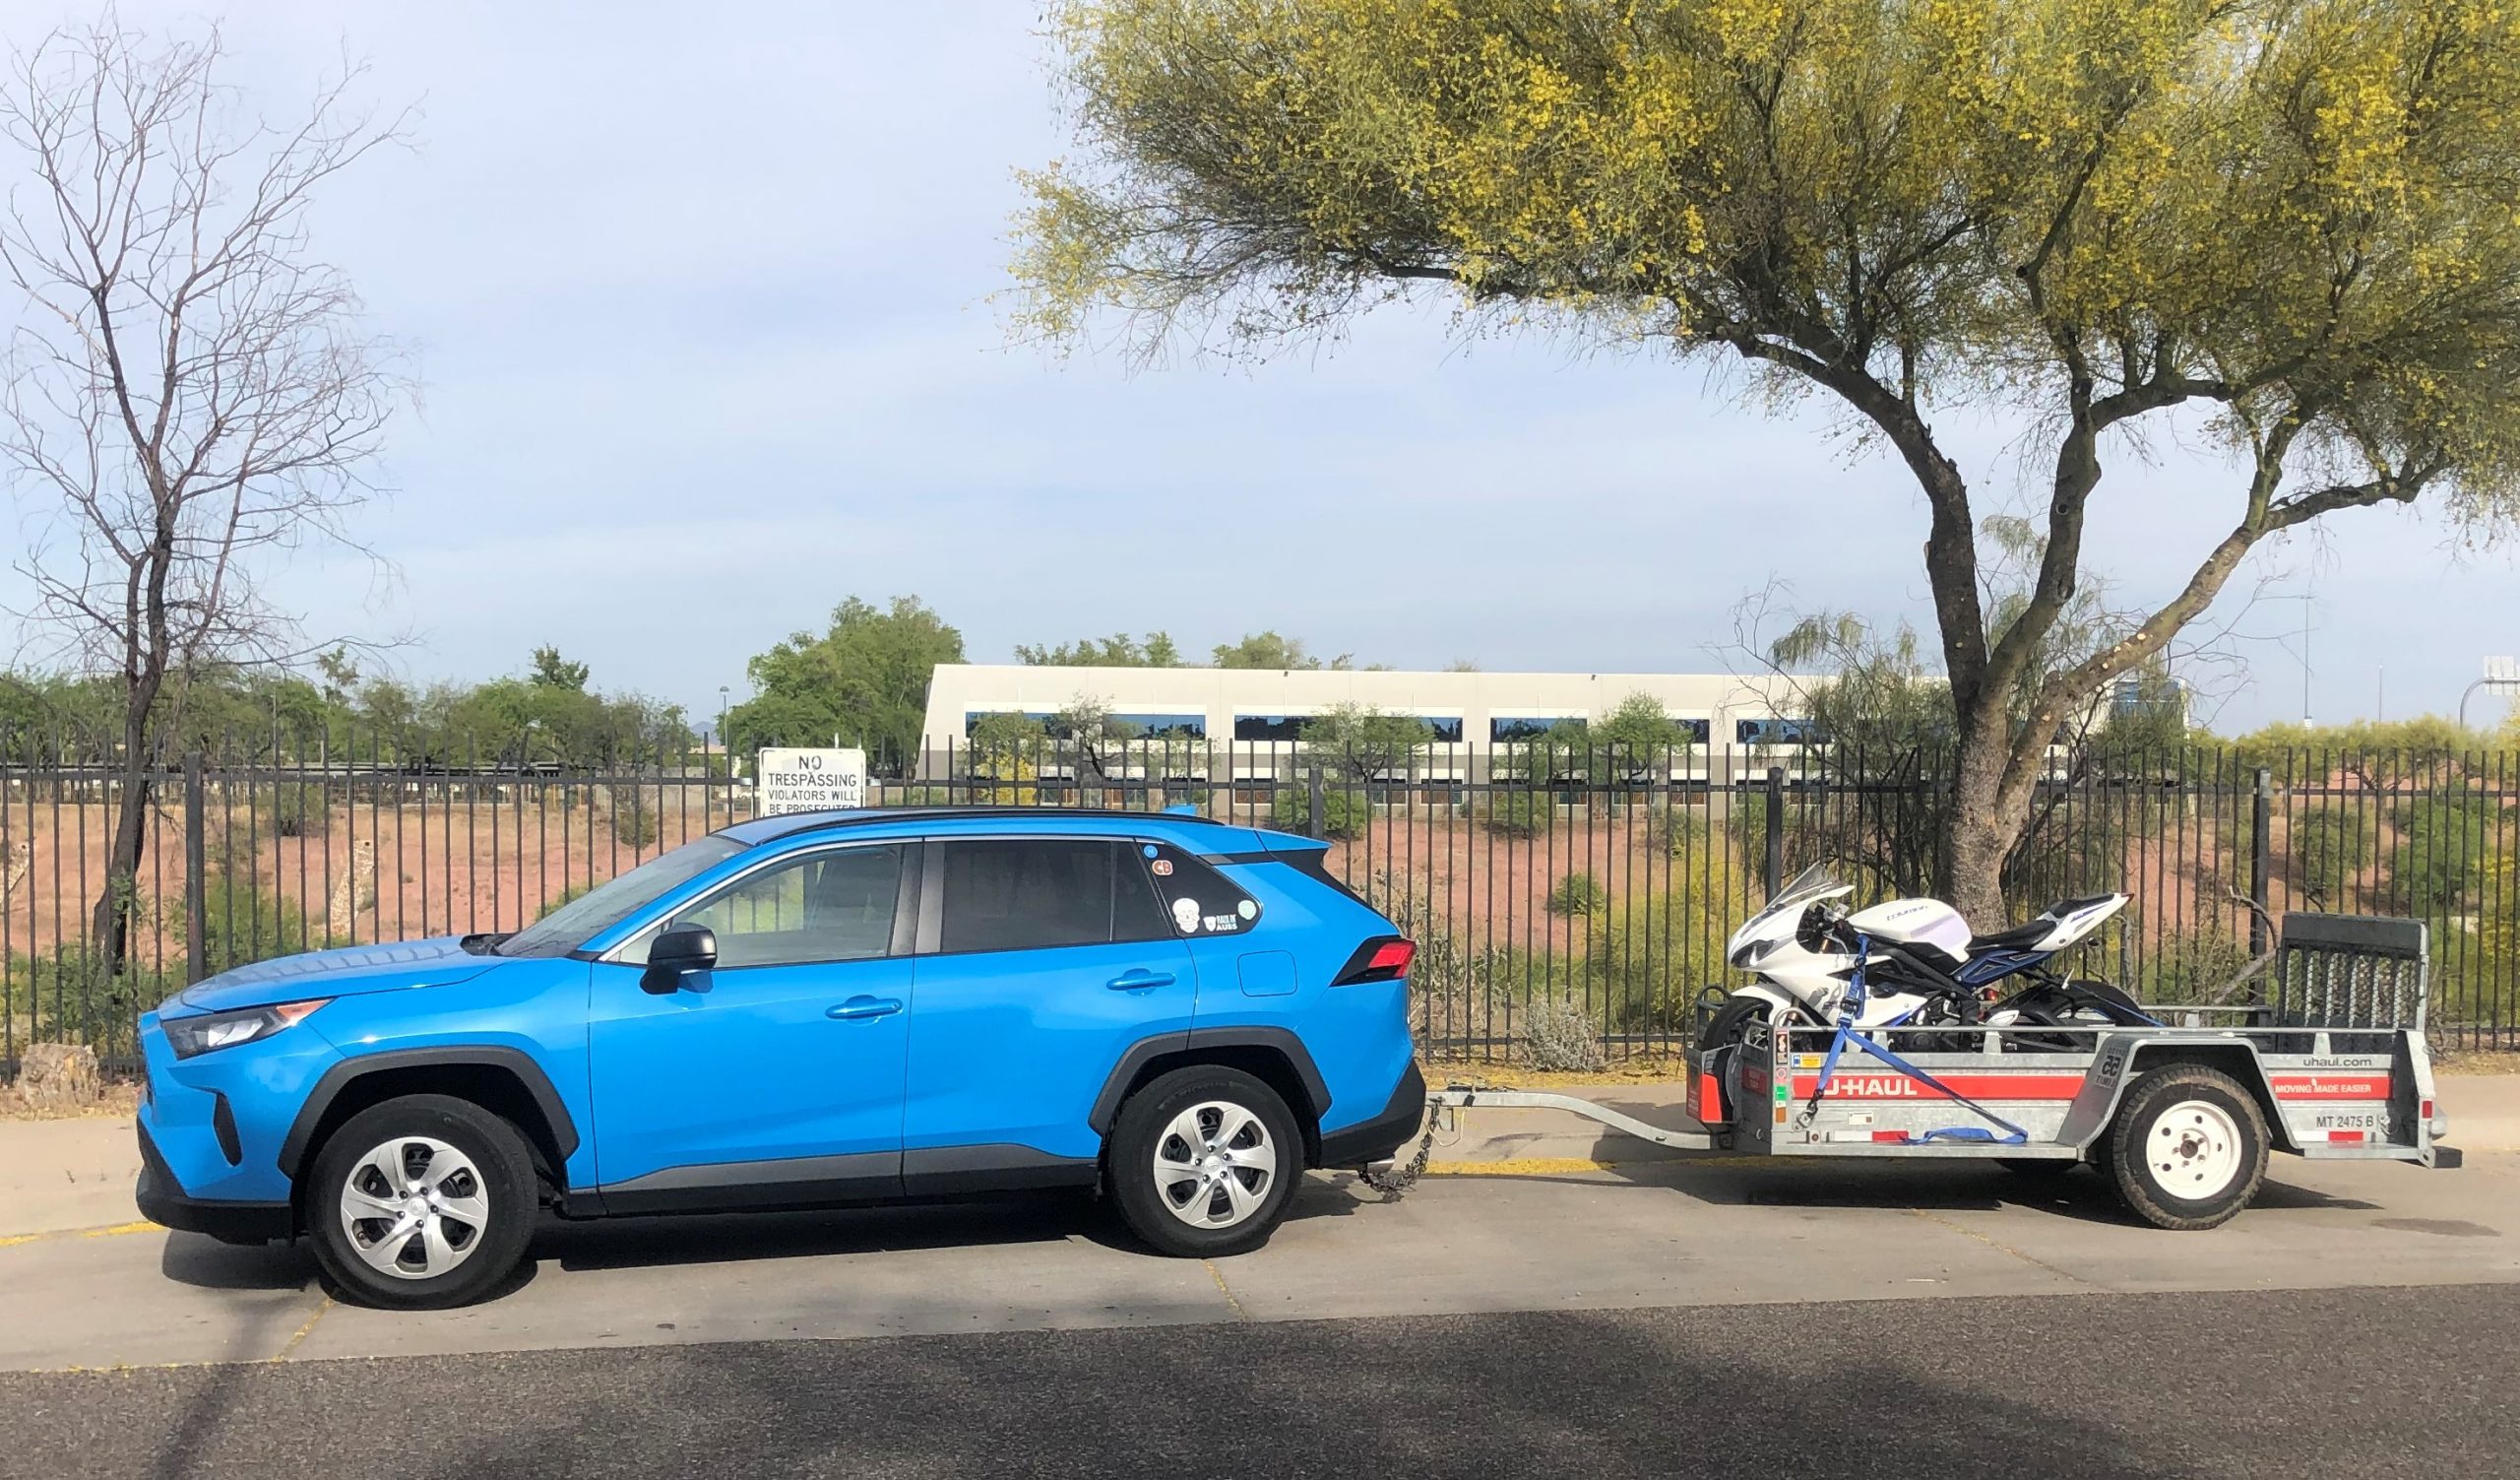
Just about any vehicle can pull those trailers. I tow with a 2019 Toyota Rav4 that has a towing capacity of 1,500 pounds and don’t have any issues. Just make sure you have an appropriately-rated hitch, a 2″ ball, and a 4-pin trailing wiring harness.
The trailer will not come with any straps to secure the bike, however. The best method for tying down the bike will depend on the model/style. For a fully-faired super sport like my Daytona 675, I would recommend two heavy ratchet straps, two cam-lock straps or ratchet straps, and two “softloops.” This kit on Amazon has everything you’ll need.
The two softloops can go around your handlebar grips. On each side, a ratchet strap should go from the softloop to the D-ring on the trailer. At the back of the bike, use a ratchet strap or cam-lock strap on each side from the passenger peg mount to the D-ring on the trailer.
If you’re unfamiliar with tying a bike down to a trailer, check out this video that covers the basic concept:
And that’s it! If you follow those steps, you should be well-prepared for your first trackday. Have any additional questions or tips you want to share? Comment below!