Category: 3D printing

  • Seal 3D Scanner Review

    Seal 3D Scanner Review

    Reviewing 3DMakerpro’s Seal 3D scanner. I have mixed feelings about 3D scanners in general, but this one works relatively well. Let me know if you want an in-depth guide on how to get the best results from 3D scanners like this!

    Specs of the PC I ran JMStudio on:

    • Windows 11 Pro
    • Intel i7-3700k
    • 64GB DDR5 RAM
    • NVIDIA GeForce RTX 3060 Ti
  • WeCreat Vision Laser Cutter Review

    WeCreat Vision Laser Cutter Review

    WeCreat is a new player in the laser cutter industry and their first product is a machine aimed at the hobbyist and prosumer market: the WeCreat Vision. In this review, I’ll help you decide if the WeCreat Vision is worth your hard-earned cash.

    Disclaimer: WeCreat provided me with this laser cutter free of charge, but this review is as unbiased as possible. WeCreat did not pay for this review and these are entirely my own thoughts.

    The WeCreat Vision is one of many diode laser cutters to hit the market over the past couple of years. Diode lasers are generally less powerful than CO2 lasers, but they’re more affordable and simpler. They also operate at different wavelength, which changes the types of materials you can cut or engrave.

    Power comparisons between diode lasers and CO2 lasers are not 1:1, but the WeCreat Vision has a 20W laser diode that is quite powerful. Many of the current crop of diode laser cutters have similar power and it is a good choice for general cutting and engraving.

    But unlike most hobbyist laser cutters that have open frames, the WeCreat Vision has a full enclosure. That is a big deal when it comes to safety and it also allows for smoke/fume extraction. WeCreat sells a fume extractor accessory for this purpose and it makes the Vision a particularly good choice for those working indoors.

    Interestingly, the WeCreat Vision has a Z axis lift system that expands the enclosure. That means the machine is more compact when the Z axis is all the way down, which is useful for shipping and transportation.

    Features

    The WeCreat Vision has a few features that make it stand out. My favorite is the camera that points down onto the bed. That lets you position new cuts onto the material without taking measurements or messing around with origins. The accuracy isn’t perfect and sometimes cuts start a millimeter or two from where you position them, but this feature is still incredibly useful if you want to cut several parts from a single sheet of material.

    There is also an available rotary axis accessory for engraving cylindrical objects. Once again, the camera is useful for positioning designs onto cups, mugs, and other round parts. The rotary axis mounts with two screws and connects with a single cable, so attachment and removal is quick. The chuck isn’t machinist-grade, but it is more than adequate for this application.

    And air assist helps the WeCreat Vision achieve clean cuts. The air pump is an external unit, but it is unobtrusive and pulls its power from the main machine.

    Software

    At this time, the WeCreat Vision supports Lightburn and WeCreat MakeIt! software. The former is proven and reliable, but the latter gives you access to all of the Vision’s features and so I chose to use it.

    With WeCreat MakeIt! running on my Windows PC, I was able to operate the WeCreat Vision through USB and WiFi.

    MakeIt! has all the functionality that most people will want. You can use your own designs, designs from the WeCreat library, or create designs using the built-in text and drawing tools.

    The Vision itself doesn’t have any onboard controls, so you setup everything through the MakeIt! software. After sending a new job through the software, you push the singular button on the machine to start. This is minor nitpick, but I wish it wasn’t necessary to push that button to start a job. Walking from the PC to the Vision could be hassle if they’re located far from each other.

    MakeIt! generally did everything I needed it to do, but I did encounter a frustrating bug when importing DXF drawings. For whatever reason, it imported every drawing at about 1/3 the size that it should. So a 100×100mm square would come in at 35.3×35.3mm. That can be fixed by scaling the drawing back up and WeCreat support says they’ll fix the problem in a future update, but it was still annoying and may potentially cause small errors with parts that require tight tolerances.

    You’ll also find some features missing that you might expect. For instance, I couldn’t find any way to change the angle of fill engrave passes or to fine-tune image processing.

    Performance

    The performance of the WeCreat Vision is very good—as long as you have the appropriate expectations. You won’t, for example, but cutting through sheet metal. That would require a much more powerful and expensive laser with a different wavelength.

    But you can engrave stainless steel, which works well and looks great. You can also engrave just about any other metal that has a coating, like anodization. Other engravable materials include stone and ceramic. I tested ceramic with pretty nice results.

    When it comes to cutting, the WeCreat Vision works best with wood, leather, paper, fabric, and acrylic.

    You should, however, be aware that the color of the acrylic matters. That is because of how different colors absorb the wavelength of the laser. WeCreat says that you should stick to black for the best results, but I tested a whole rainbow of opaque colors to find out what you can realistically cut.

    Black was the best and the Vision easily cut through 3mm black acrylic in a single quick pass. Red, dark green, yellow, and orange all yielded acceptable cuts, but they required three passes to get through 3mm sheet at the same speed/power as black.

    Light blue, dark blue, pink, light green, and white all failed to achieve cuts that I would deem acceptable. You can cut through them with enough power and passes, but the cuts are thick and messy. That may be okay for some applications, but the results were too poor for me to consider them a success.

    Conclusion

    Overall, I think the WeCreat Vision is a good laser cutter that you should consider. The price point is competitive with other similar machines on the market and the features are great. The rotary axis and fume extractor accessories really make it solid prosumer or small business option.

    The Vision has a maximum working area of 420×290mm (16.54×11.42 inches) and can accommodate material up to 140mm (5.51 inches). If that meets your requirements and the material options fit your needs, then I think you’ll be happy with this machine.

    The software isn’t perfect, but it works pretty well and the WeCreat team seems to be actively improving it. You also have the option to use Lightburn, though you may lose access to some of the Vision’s features.

    The hardware feels well-made and well-engineered. The Vision is a handsome machine and the full enclosure is great for safety, fumes, and cleanliness. I plan to make the WeCreat Vision the primary laser cutter in my maker workflow and feel confident recommending it to others.

  • AnkerMake M5C 3D Printer Review

    AnkerMake M5C 3D Printer Review

    There is an approximately 100% chance that you own an Anker smartphone charger, but did you know that they also have a 3D printer brand called AnkerMake? Last year, they released their first 3D printer: the AnkerMake M5. Today I’m going to review their newest model: the AnkerMake M5C.

    A rocky start

    When the AnkerMaker M5 launched on Kickstarter, I wrote an article for Hackster.io expressing my skepticism. AnkerMake made a lot of claims in the campaign marketing that I found farfetched.

    Some of those claims, like the “5X faster printing,” were simply misleading. Others, like the advertised AI camera, seemed to be overly ambitious.

    It turns out that I was right, because many reviewers felt that the AnkerMake M5 did not live up to the marketing. Sean Hollister of The Verge, for example, said that the AI camera was a joke. AnkerMake didn’t even enable that feature until well after the release of the printer, and most said that it still doesn’t work as advertised.

    So it would be fair to say that I had a low opinion of AnkerMake. Then they reached out to me and asked if I wanted to review the new AnkerMake M5C and I couldn’t pass up the opportunity.

    Initial impressions

    The AnkerMake M5C seems to be a stripped-down version of the AnkerMake M5, with some of the expensive features removed. That also has the benefit of omitting features that never worked, like the AI camera.

    The basic specs are typical for an entry-level 3D printer of this price: it has a 220×220×250mm build volume, a direct drive extruder with an all-metal hot end that can reach 300°C, dual Z axis lead screws, a heated bed that can reach 100°C, and automatic mesh bed leveling.

    But there are a couple things that set it apart. First, AnkerMake claims that it can print at 500mm/s and that is very fast. It also has a custom aluminum alloy frame that is very attractive. And finally, it has a “play in one click” control interface that AnkerMake seems really proud of.

    One-click control

    AnkerMake’s videos seem to treat the “play in one click” feature like something really exciting, but I dislike it.

    The AnkerMake M5C does not have any kind of control panel or screen built into the printer. The only control on the printer itself is the play/pause button. Users can configure that button’s functions, with different actions tied to a single-press, a double-press, or a long-press. You can, for example, set it up so that a double-press reprints the last job.

    I don’t like this at all.

    Why? Because it means that you have to use the smartphone app or the desktop software every time you want to do anything. Want to change the filament? You need to use the smartphone app. Want to print a new file? You need to use the desktop software.

    That’s particularly annoying because you have to use both the smartphone app and the desktop software. The desktop software cannot control the printer, so you have to use the smartphone app to move the motors or set temperatures. But you can only slice a new file with the desktop software.

    That back-and-forth is annoying. I would have been much happier if the desktop software provided full control over the printer. I would have also liked a conventional control interface on the printer itself.

    Printing

    The AnkerMake M5C is actually capable of very good print quality. The only issue I ever encountered was some stringing. Because it doesn’t have an enclosure, I performed all of my prints using the PLA+ filament provided by AnkerMake.

    But though the print quality was good, using the AnkerMake M5C wasn’t always pleasant. It has silent stepper drivers, so there is almost zero motor noise. But the printer’s fans are very loud, which got annoying and mostly defeated the purpose of the silent drivers.

    Thankfully, the frame of the AnkerMake M5C is very sturdy and that helps to produce nice prints at fast speeds. The base of the printer is a big hunk of milled aluminum. That looks nice and provides a lot of rigidity. It is clear AnkerMake put a lot of the budget into that base—money that might have been better spent elsewhere.

    Speed

    AnkerMake advertises the top printing speed of the AnkerMake M5C as being 500mm/s, with 5,000mm2/s acceleration and 35mm3/s extrusion flow. Those are very impressive numbers, but they’re also misleading.

    The “fast” slicer profile does, indeed, have a max speed of 500mm/s. The problem is that it really only uses that speed for travel. All of the actual printing operations happen at much slower speeds.

    Infill speed, for instance, is 270mm/s. Outer wall speed is 150mm/s.

    Those are still respectable numbers and they’re very fast for a bed-slinger printer like this, but I don’t like the exaggerations in AnkerMake’s marketing.

    Conclusion

    I’m a little torn on this one. The AnkerMake M5C is a decent printer, but I find the marketing to be distasteful.

    I also think they made a big mistake with the “play in one click” feature and would have much preferred a conventional control panel. Similarly, I didn’t like having to switch between the smartphone app and desktop software.

    At $399, I think the AnkerMake M5C is a questionable choice. You can find printers that work just as well, but that cost significantly less. However, the AnkerMake M5C is very well-built and that price is probably reasonable given how much this printer costs to manufacture.

    I wouldn’t recommend the AnkerMake M5C, but those who do end up with this printer will probably be happy with it.

  • 3D Printer Reviews

    3D Printer Reviews

    I am now publishing reviews on the Hackster.io column The Maker’s Toolbox.

    If you’d like me to review something, please contact me at: coward.cameron@gmail.com

    Below, you’ll find a list of 3D printer’s I reviewed in the past.

    To see a list of review that aren’t 3D printers (including laser cutters, CNC machines, and much more), please visit this page.

    Elegoo Saturn 4 Ultra 16KBuy on Amazon

    Elegoo Centauri CarbonBuy on Elegoo

    AnkerMake M5CBuy on Amazon

    Bambu Lab P1SBuy on Bambu Lab

    Anycubic Photon Mono M5sBuy on Amazon

    Creality Ender-5 S1Buy on Amazon

    Anycubic Photon M3 PremiumBuy on Amazon

    Sovol SV06Buy on Sovol

    Anycubic Photon D2Buy on Anycubic

    Phrozen Sonic Mighty 8KBuy on Phrozen (15% off coupon “22PRCCDP15”)

    ELEGOO Neptune 3Pre-order from ELEGOO

    ELEGOO Saturn 2Pre-order from ELEGOO

    Anycubic Kobra MaxBuy on Amazon

    Anycubic KobraBuy on Amazon

    ELEGOO Mars 3Buy on Amazon

    Anycubic Photon M3Buy on Amazon

    Phrozen Sonic Mini 8K

    Anycubic Photon Mono X 6KBuy on Amazon

    Anycubic Photon Mono X and Wash & Cure Machine Plus – Buy Mono X or Wash & Cure Machine

    ELEGOO SaturnBuy on Amazon

    UNIZ IBEEBuy on Amazon

    BIBO Dual-ExtruderBuy on Amazon

    Sparkmaker Original

    Polymaker PolysherBuy on Amazon

    Original Prusa i3 MK3S (review no longer available)

    Monoprice Maker Select V2 (review no longer available)

    Lulzbot TAZ 4 (review no longer available)

    Printrbot Simple Metal (review no longer available)

  • Comparatron – DIY Digital Optical Comparator

    Comparatron – DIY Digital Optical Comparator

    Comparatron won the Grand Prize in the Instructables Reuse Challenge contest!

    Many of my projects interface with existing devices or items, which means that I have to obtain accurate dimensions of those objects to ensure a good fit. That’s easy to do with calipers if the object is simple, but it is very difficult when the object has a complex shape.

    Back when I was a mechanical designer, I worked for a medical company where my job involved reverse-engineering tiny medical devices (like bone screws). To get precise measurements, I used an instrument called an optical comparator that lets you measure distances and angles through a microscope.

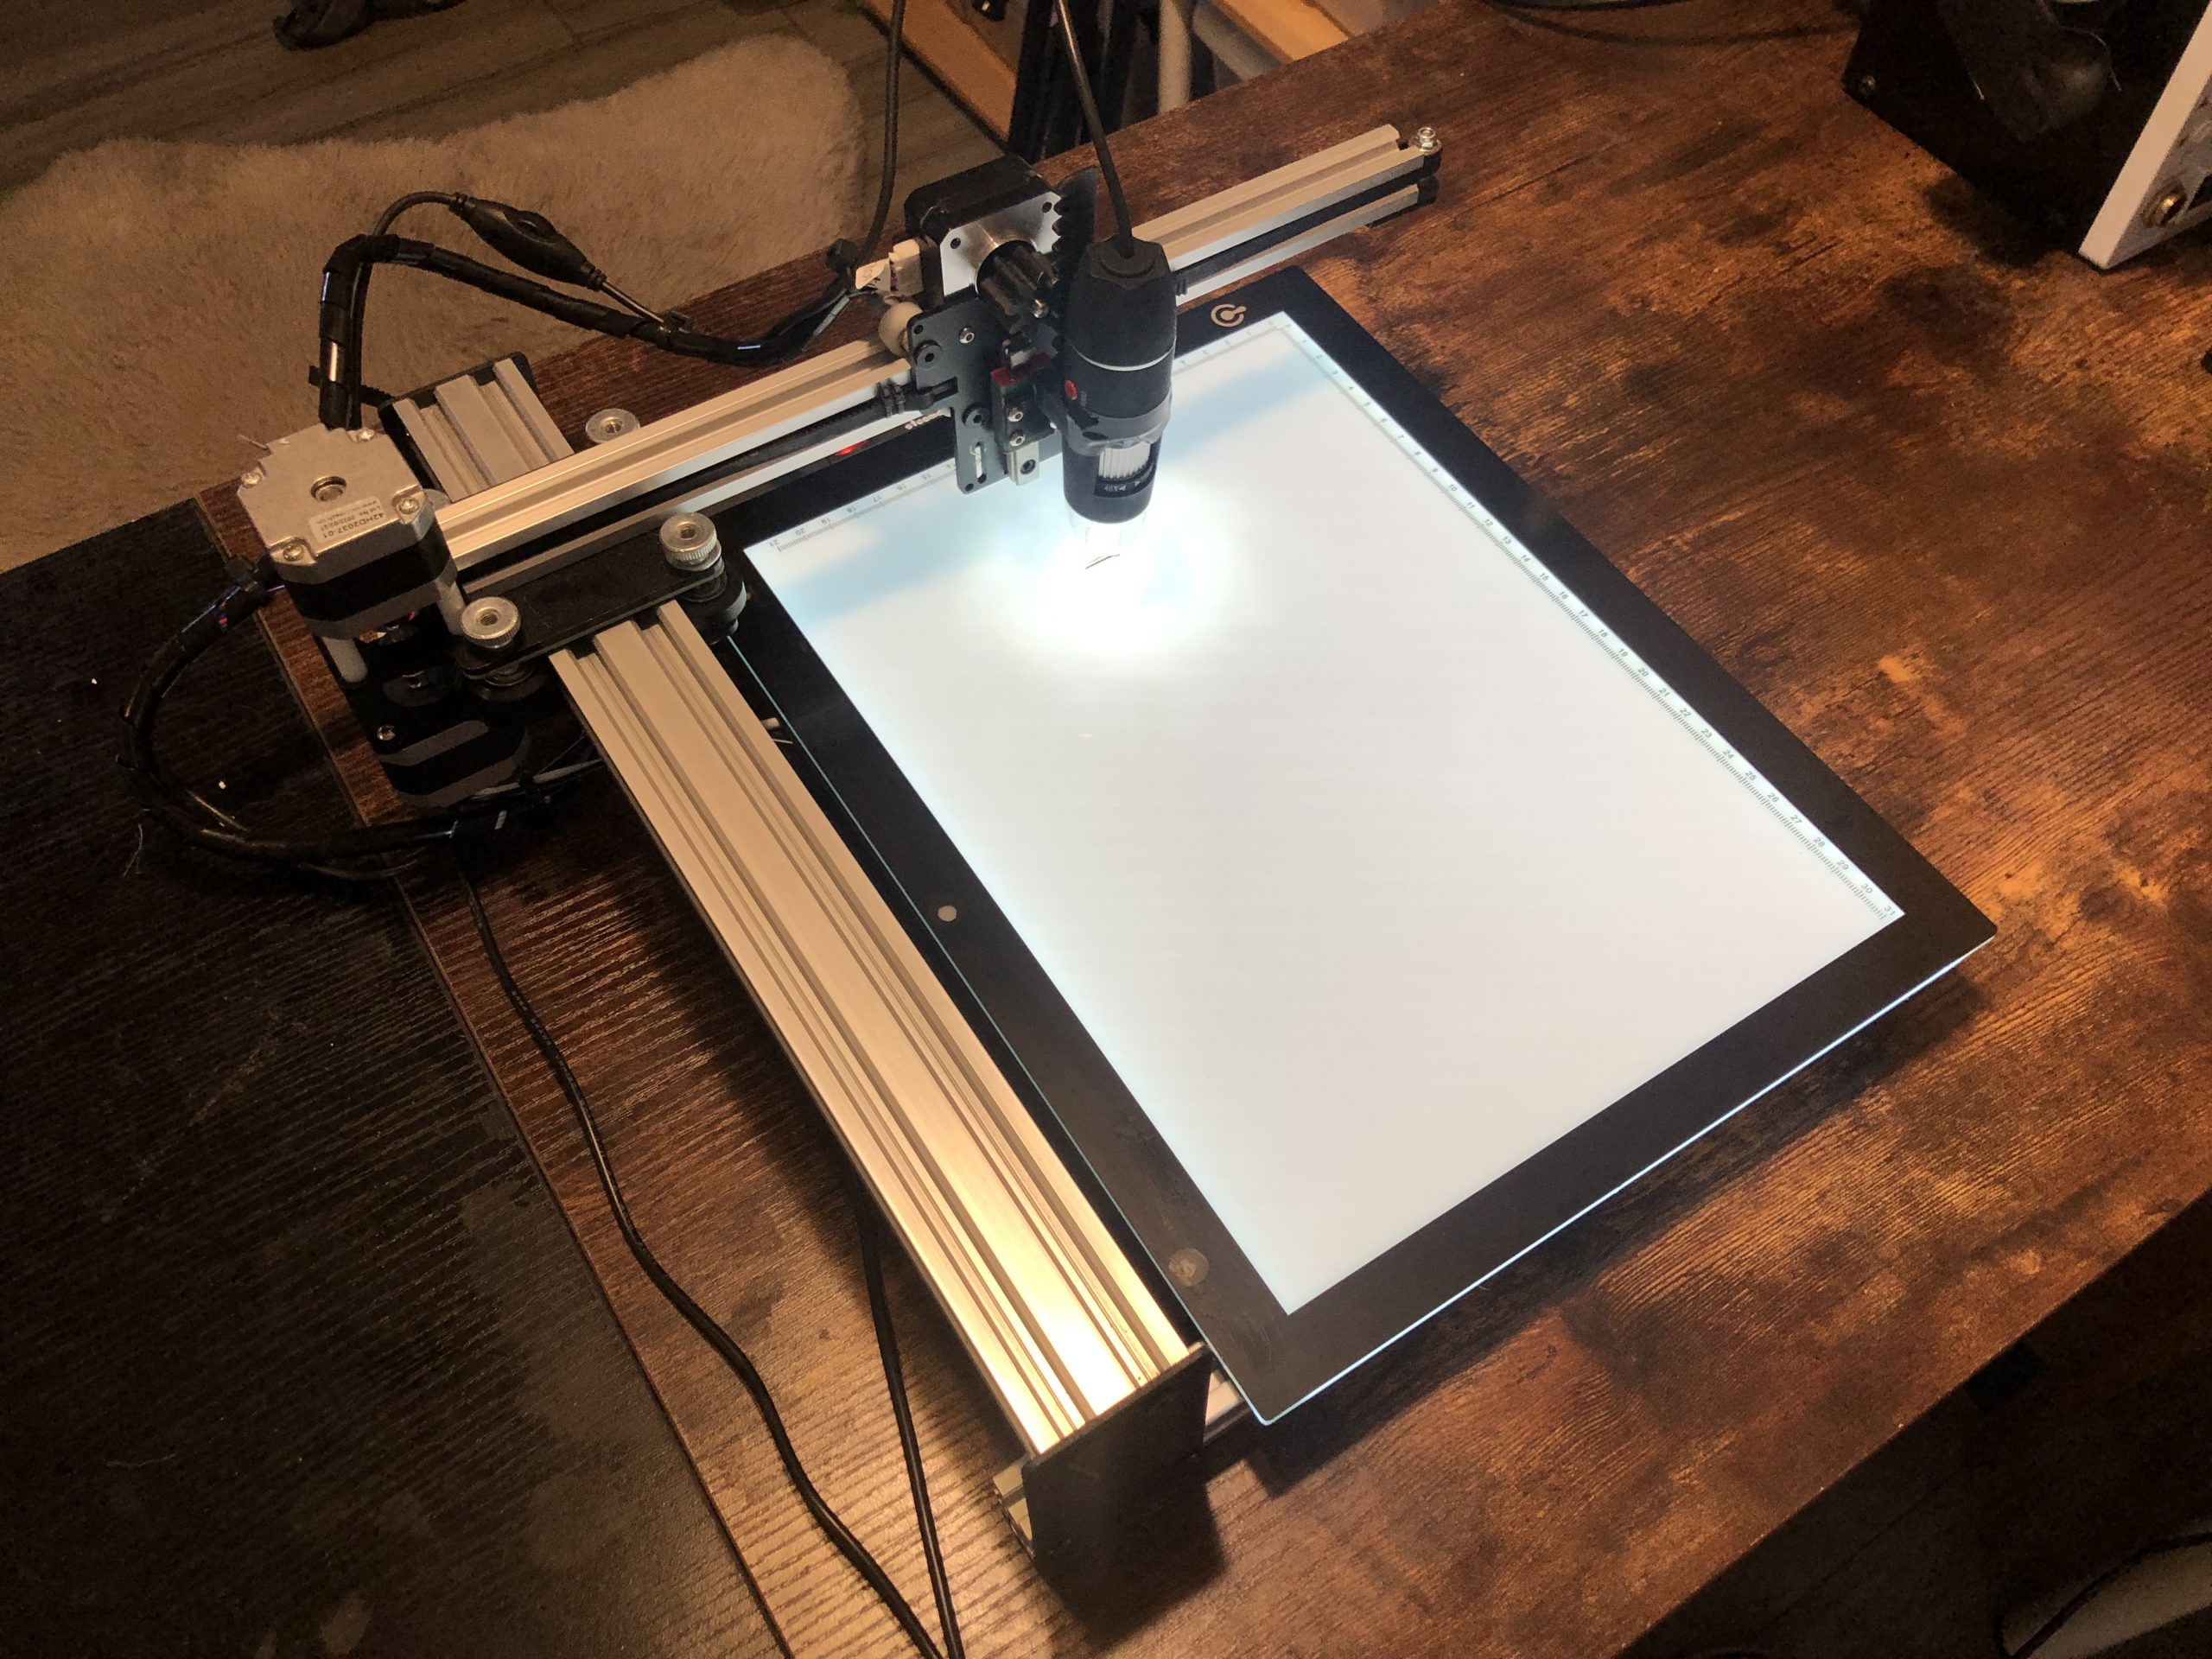
    Optical comparators are very expensive instruments (easily tens of thousands of dollars), so I decided to build an affordable version that I’m calling Comparatron.

    Demonstrating Comparatron

    Building this requires the following parts:

    iDraw Pen Plotter 2.0

    USB Microscope

    Tracing light box

    USB Hub

    Good news! The folks at iDraw liked this project so much that they’re giving everyone 15% off their pen plotters. Just go to their store (https://idrawpenplotter.com/shop) and use the coupon code “CAMERON” to get the discount.

    Building and using

    Full build instructions, 3D-printable files, and software are available on Instructables here: https://www.instructables.com/Comparatron-an-Affordable-Digital-Optical-Comparat/

    Additional information and a standalone executable version of the Python software is available on GitHub here: https://github.com/theserialhobbyist/comparatron

    But here is a basic breakdown:

    Print the two parts on any 3D printer. Then remove the iDraw Pen Plotter’s pen lift mechanism and attach the microscope mount, and press-fit the spur gear to the motor shaft.

    Connect the USB cables to your computer (a USB hub makes things easier).

    Launch the software (either the Python script or the standalone executable) on a Windows PC, connect to the pen plotter, then move the microscope over your part and start marking points.

    When you’ve marked all of your points, export the DXF file. Then import that DXF file into the CAD/design software of your choice and use the points as references for your design.

    That’s it! I think this is a very useful tool and I’m quite proud of it. If you decide to build one, please let me know!
  • Multi-Material Resin 3D Printing Tutorial

    Multi-Material Resin 3D Printing Tutorial

    I recently wrote a how-to guide on multi-color resin 3D printing. As soon as I saw that that technique was a success, I knew I wanted to try it with different material types as well.

    There are several kinds of photosensitive resin available for 3D printing, which mimic different kinds of engineering plastics. For instance, you might have seen some labeled as “ABS-like.” But for this proof of concept, I wanted wildly different kinds of resins, so I chose a flexible resin and a standard rigid resin.

    Supplies

    You can use pretty much any rigid resin you like, but the stuff linked above is what I used here. There aren’t as many flexible resin options on the market. Siraya Tech’s Tenacious is probably the most well-known, but I used 3DMaterials’ SuperFast SuperFlex resin and was very impressed with it. It printed well on my ELEGOO Saturn 2 and was quite flexible.

    The idea

    As with the multi-color resin 3D printing technique, the idea here is to print an object in your primary material first. In my case, that was the flexible resin. That object should have modeled-in cavities that you can then fill with your secondary resin (the rigid resin).

    When you shine a 405nm UV flashlight on the liquid resin you just poured in, it will cure and harden. It will also fuse to the original print. Theoretically, you could fill several different cavities with different resin colors and materials. The result is a multi-material print.

    Multi-material resin 3D printing
    Multi-material resin 3D printing

    Obviously, this does have some restrictions. Namely, your model needs to have accessible cavities for your secondary resin. This will limit the geometry you can print, but I think this technique could still be very useful.

    The steps

    My original guide on multi-color resin 3D printing goes into far more detail on each step, but I’ll cover the basics again here.

    First, print your object using flexible filament.

    Then, using a blunt syringe, fill the cavities with your rigid filament.

    Use the UV flashlight to cure the new resin.

    Refill and cure again until the cavities are full.

    That’s it!

  • How to: Multi-Color Resin 3D Printing

    How to: Multi-Color Resin 3D Printing

    With filament-based 3D printing, you can get multiple colors with additional extruders, manually swapping filament, or with something like a Mosaic Palette device. But one of the disadvantages of resin 3D printing is that it is very difficult to change colors during a print.

    In this article, I’ll walk you through a technique that lets you get multiple colors in a resin print and that is easy to do. Redditor u/ChinchillaWafers suggested this technique in this post and I decided to give it a try. It worked quite well, so I’m sharing it with you all.

    Supplies

    To do this, you’ll need the following supplies in addition to your printer:

    You can use as many resin colors as you like, but I suggest using colors that contrast well. Gray on white, for example, won’t show up very well. But black on white will.

    The idea

    The idea here is to leave debossed letters or other spaces in your printed model, such as text inset into a surface. You can then fill those with your contrasting liquid resin and use the UV flashlight to cure it.

    A 405nm UV flashlight will cure liquid resin just like your MSLA resin 3D printer does. Other UV wavelengths might work, but these resins are meant to cure with 405nm, so it is best to stick to that.

    Because you’re pouring liquid resin into cavities in your print, you need to make sure you model can be physically oriented so that those cavities are level. Otherwise, it will be hard to keep the resin from spilling over the edges before it cures and hardens.

    The steps

    Step 1:

    Start by printing your model like you normally would. For my test, I printed a simple sign with debossed lettering that says “Cameron & Maria” (me and my girlfriend). I printed this in white so that most other colors would contrast well.

    Step 2:

    Remove supports, then rinse and cure your part. You can also finish curing the part after adding the contrasting resin, but I chose to cure it first since I would be handling the part.

    Step 3:

    After putting on gloves, choose a contrasting resin color (or multiple colors) and pour it into a small, disposable container. Paint cups work well for this. You could try to pull the resin directly from the bottle, but it would be difficult to reach your syringe inside.

    Step 4:

    Make sure your print is level, then carefully fill a syringe with contrasting resin. Try to pick a syringe needle size that is a bit smaller than the smallest portion of the debossed letters.

    Then very slowly squeeze the syringe to fill your letters with the contrasting resin. You can either do all of your letters at once or do them one at a time (curing each before starting the next).

    I recommend doing them all at once in order to avoid yellowing the original print with too much UV exposure. You can see at the top left (by the “C”) that I made that mistake when I first started.

    Step 5:

    If any resin spilled over the edges, use an paper towel wetted with IPA to wipe it away. Try not to soak up the resin inside the lettering.

    Step 6:

    Turn on your UV flashlight and shine it over the lettering to cure the new resin. Depending on the depth of the lettering (mine was 2mm), curing can take anywhere from 3-15 seconds.

    Safety warning: 405nm UV light is bad for you! Avoid shining it at anything living, especially your eyes! Seriously, I take no responsibility if you blind yourself or develop skin cancer.

    Step 7:

    Repeat steps 4-6 until your letters are completely filled in. If you end up with spilled-over resin that cured, you can lightly sand the surface to remove it.

    Admire your work

    And that’s it, you’re done! This is an easy, affordable way to add more color to your resin prints. It works especially well for debossed lettering, so I will almost certainly use it in the future for projects where I want to add a name/logo to enclosures.

    Multi-color resin 3D printing

    It seems like it might also be possible to mix materials, such as a flexible resin with a rigid resin. I’m hoping to experiment with that in the future.