Tag: guide

  • Compass Lock Escape Room Puzzle

    Compass Lock Escape Room Puzzle

    I think escape rooms are really neat, but my interest is more in the puzzle design than in solving existing puzzles. So I decided to build my own!

    This is a “lock” that players open by rotating the dial to different cardinal directions, following a sequence hidden in a clue.

    Full build instructions are here: https://www.hackster.io/cameroncoward/compass-lock-escape-room-puzzle-055aff

  • LuvNoots: Wall-Mounted ePaper SMS Display

    LuvNoots: Wall-Mounted ePaper SMS Display

    Do you want a way to leave messages for your loved ones, but you’re actively boycotting 3M and can’t use Post-it Notes?

    Then this is the solution for you!

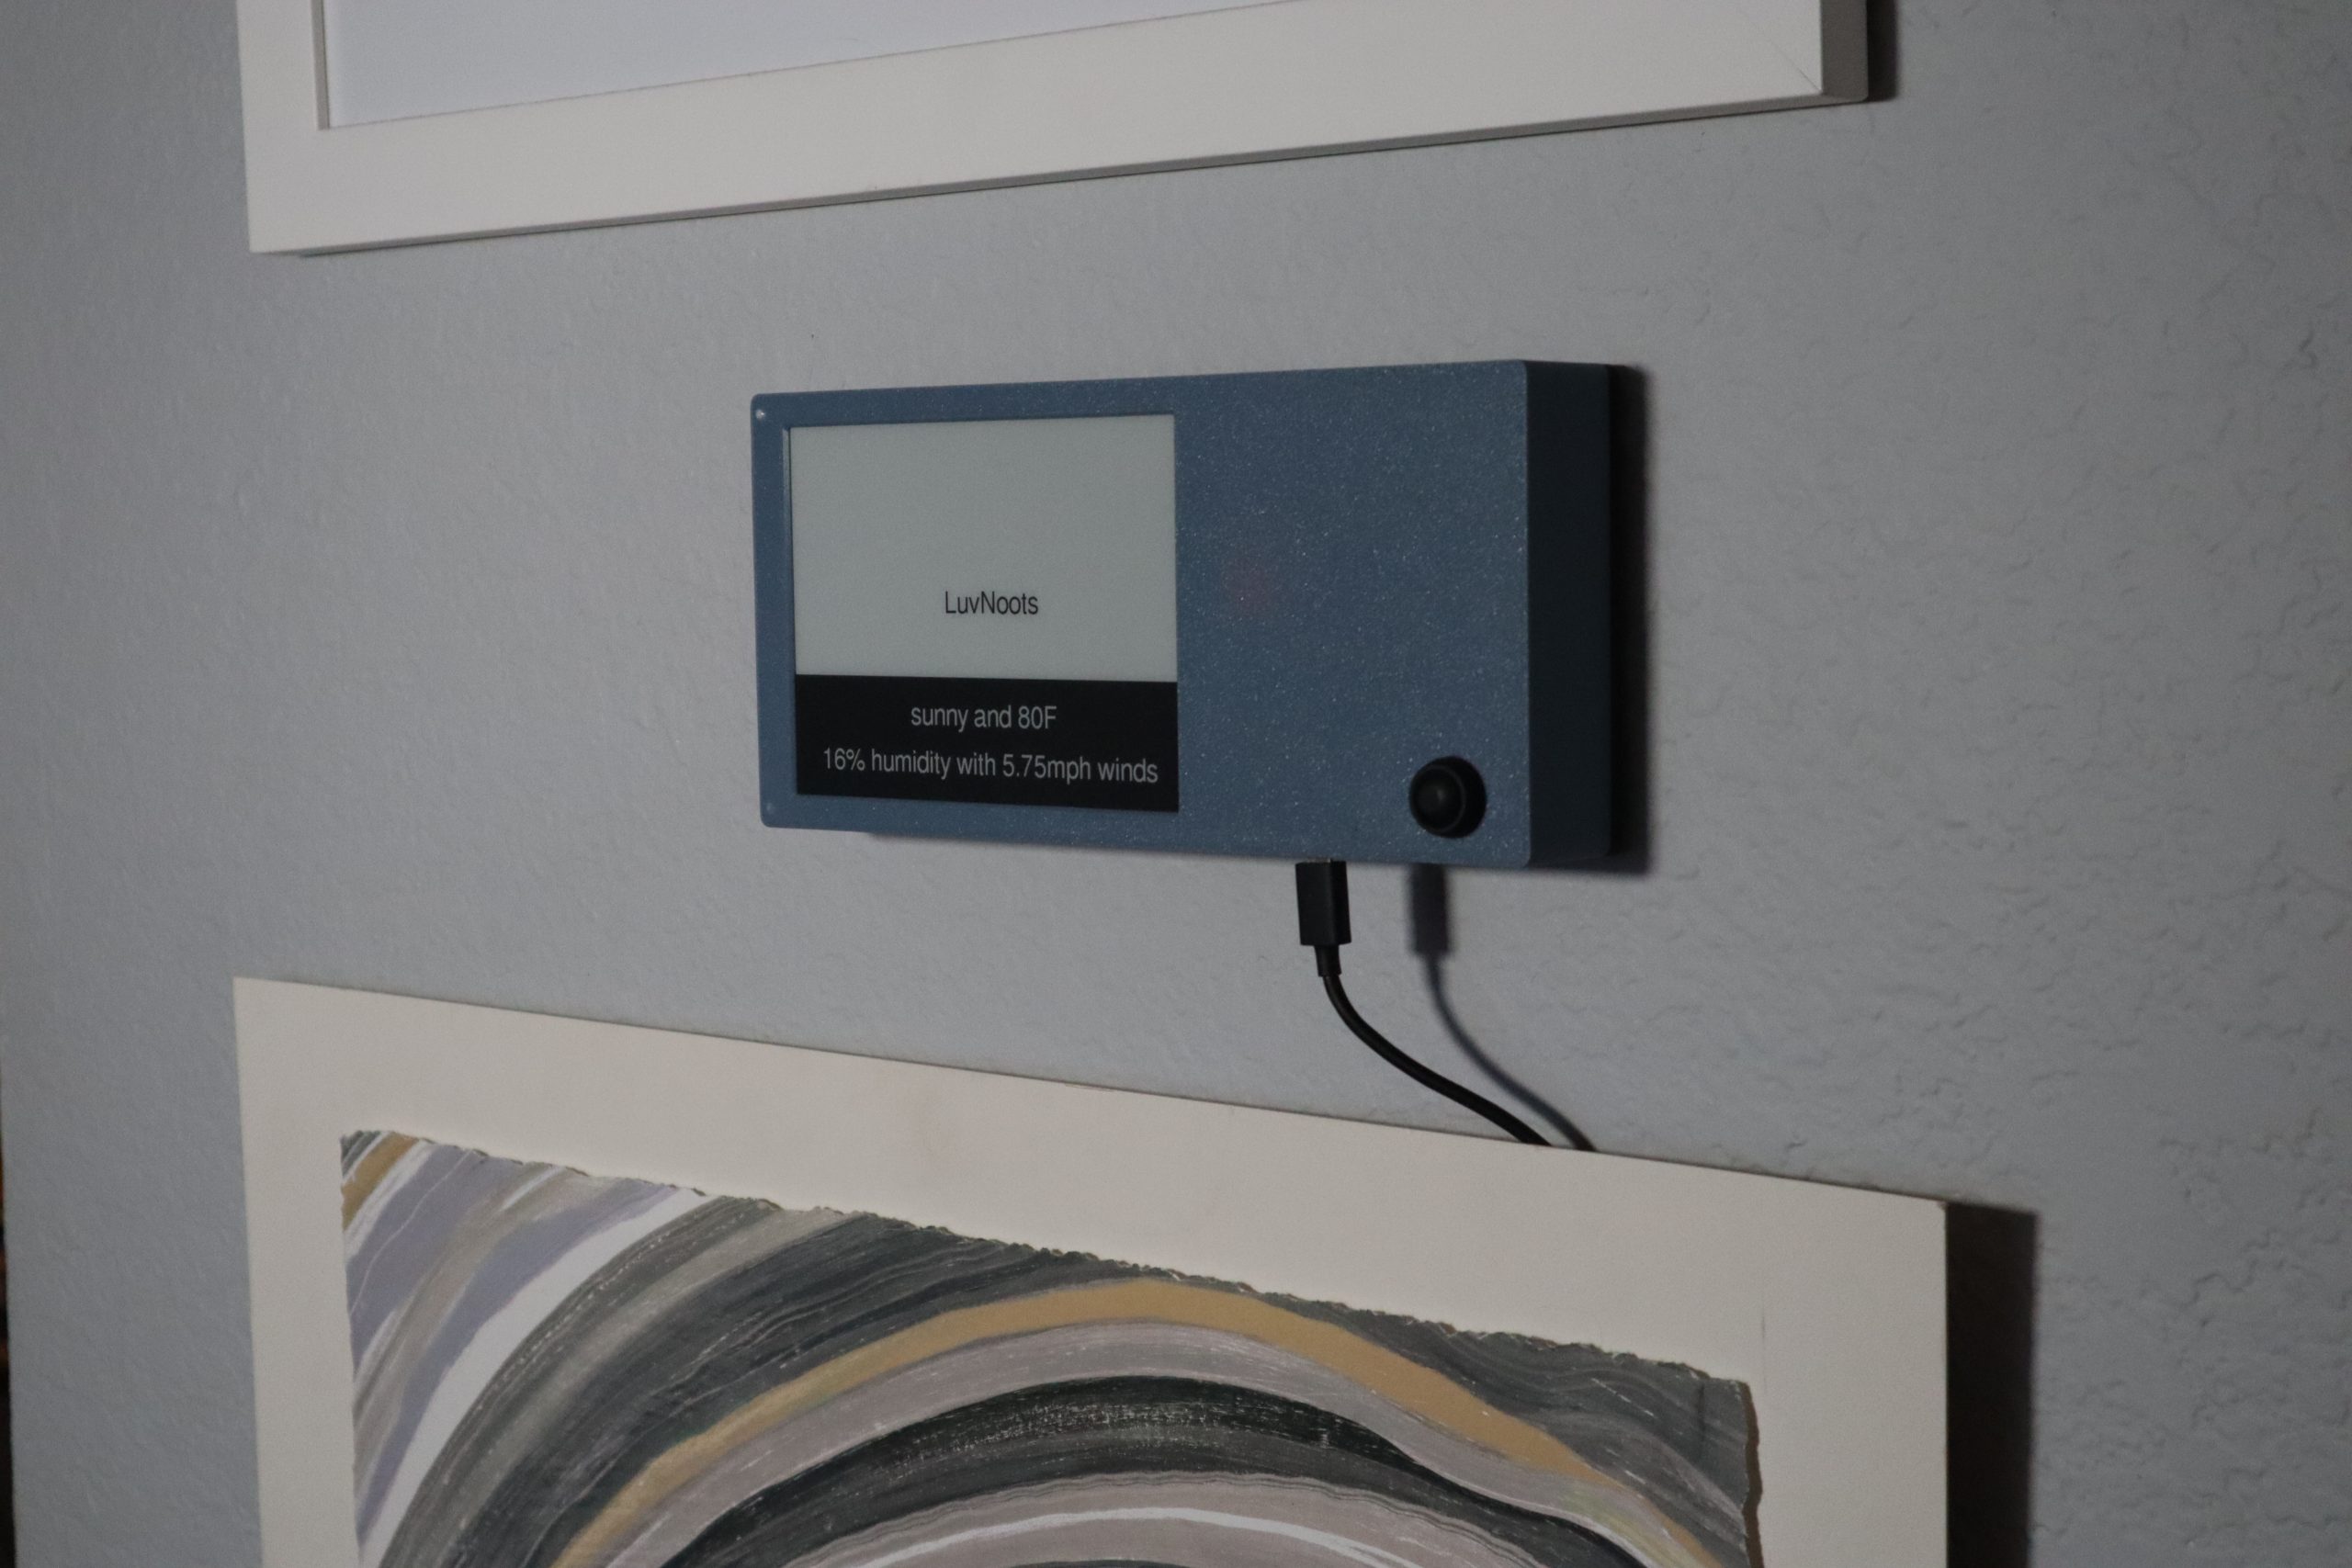
    LuvNoots is a wall-mounted display that shows text messages on a large ePaper screen. It also shows the weather, because IoT.

    Any plain SMS text message sent to the device’s phone number will show up, so you can give that number to a spouse, family member, or friends and they’ll be able to leave messages.

    Build instructions are available here:

    https://www.hackster.io/cameroncoward/luvnoots-f5b157

  • Comparatron – DIY Digital Optical Comparator

    Comparatron – DIY Digital Optical Comparator

    Comparatron won the Grand Prize in the Instructables Reuse Challenge contest!

    Many of my projects interface with existing devices or items, which means that I have to obtain accurate dimensions of those objects to ensure a good fit. That’s easy to do with calipers if the object is simple, but it is very difficult when the object has a complex shape.

    Back when I was a mechanical designer, I worked for a medical company where my job involved reverse-engineering tiny medical devices (like bone screws). To get precise measurements, I used an instrument called an optical comparator that lets you measure distances and angles through a microscope.

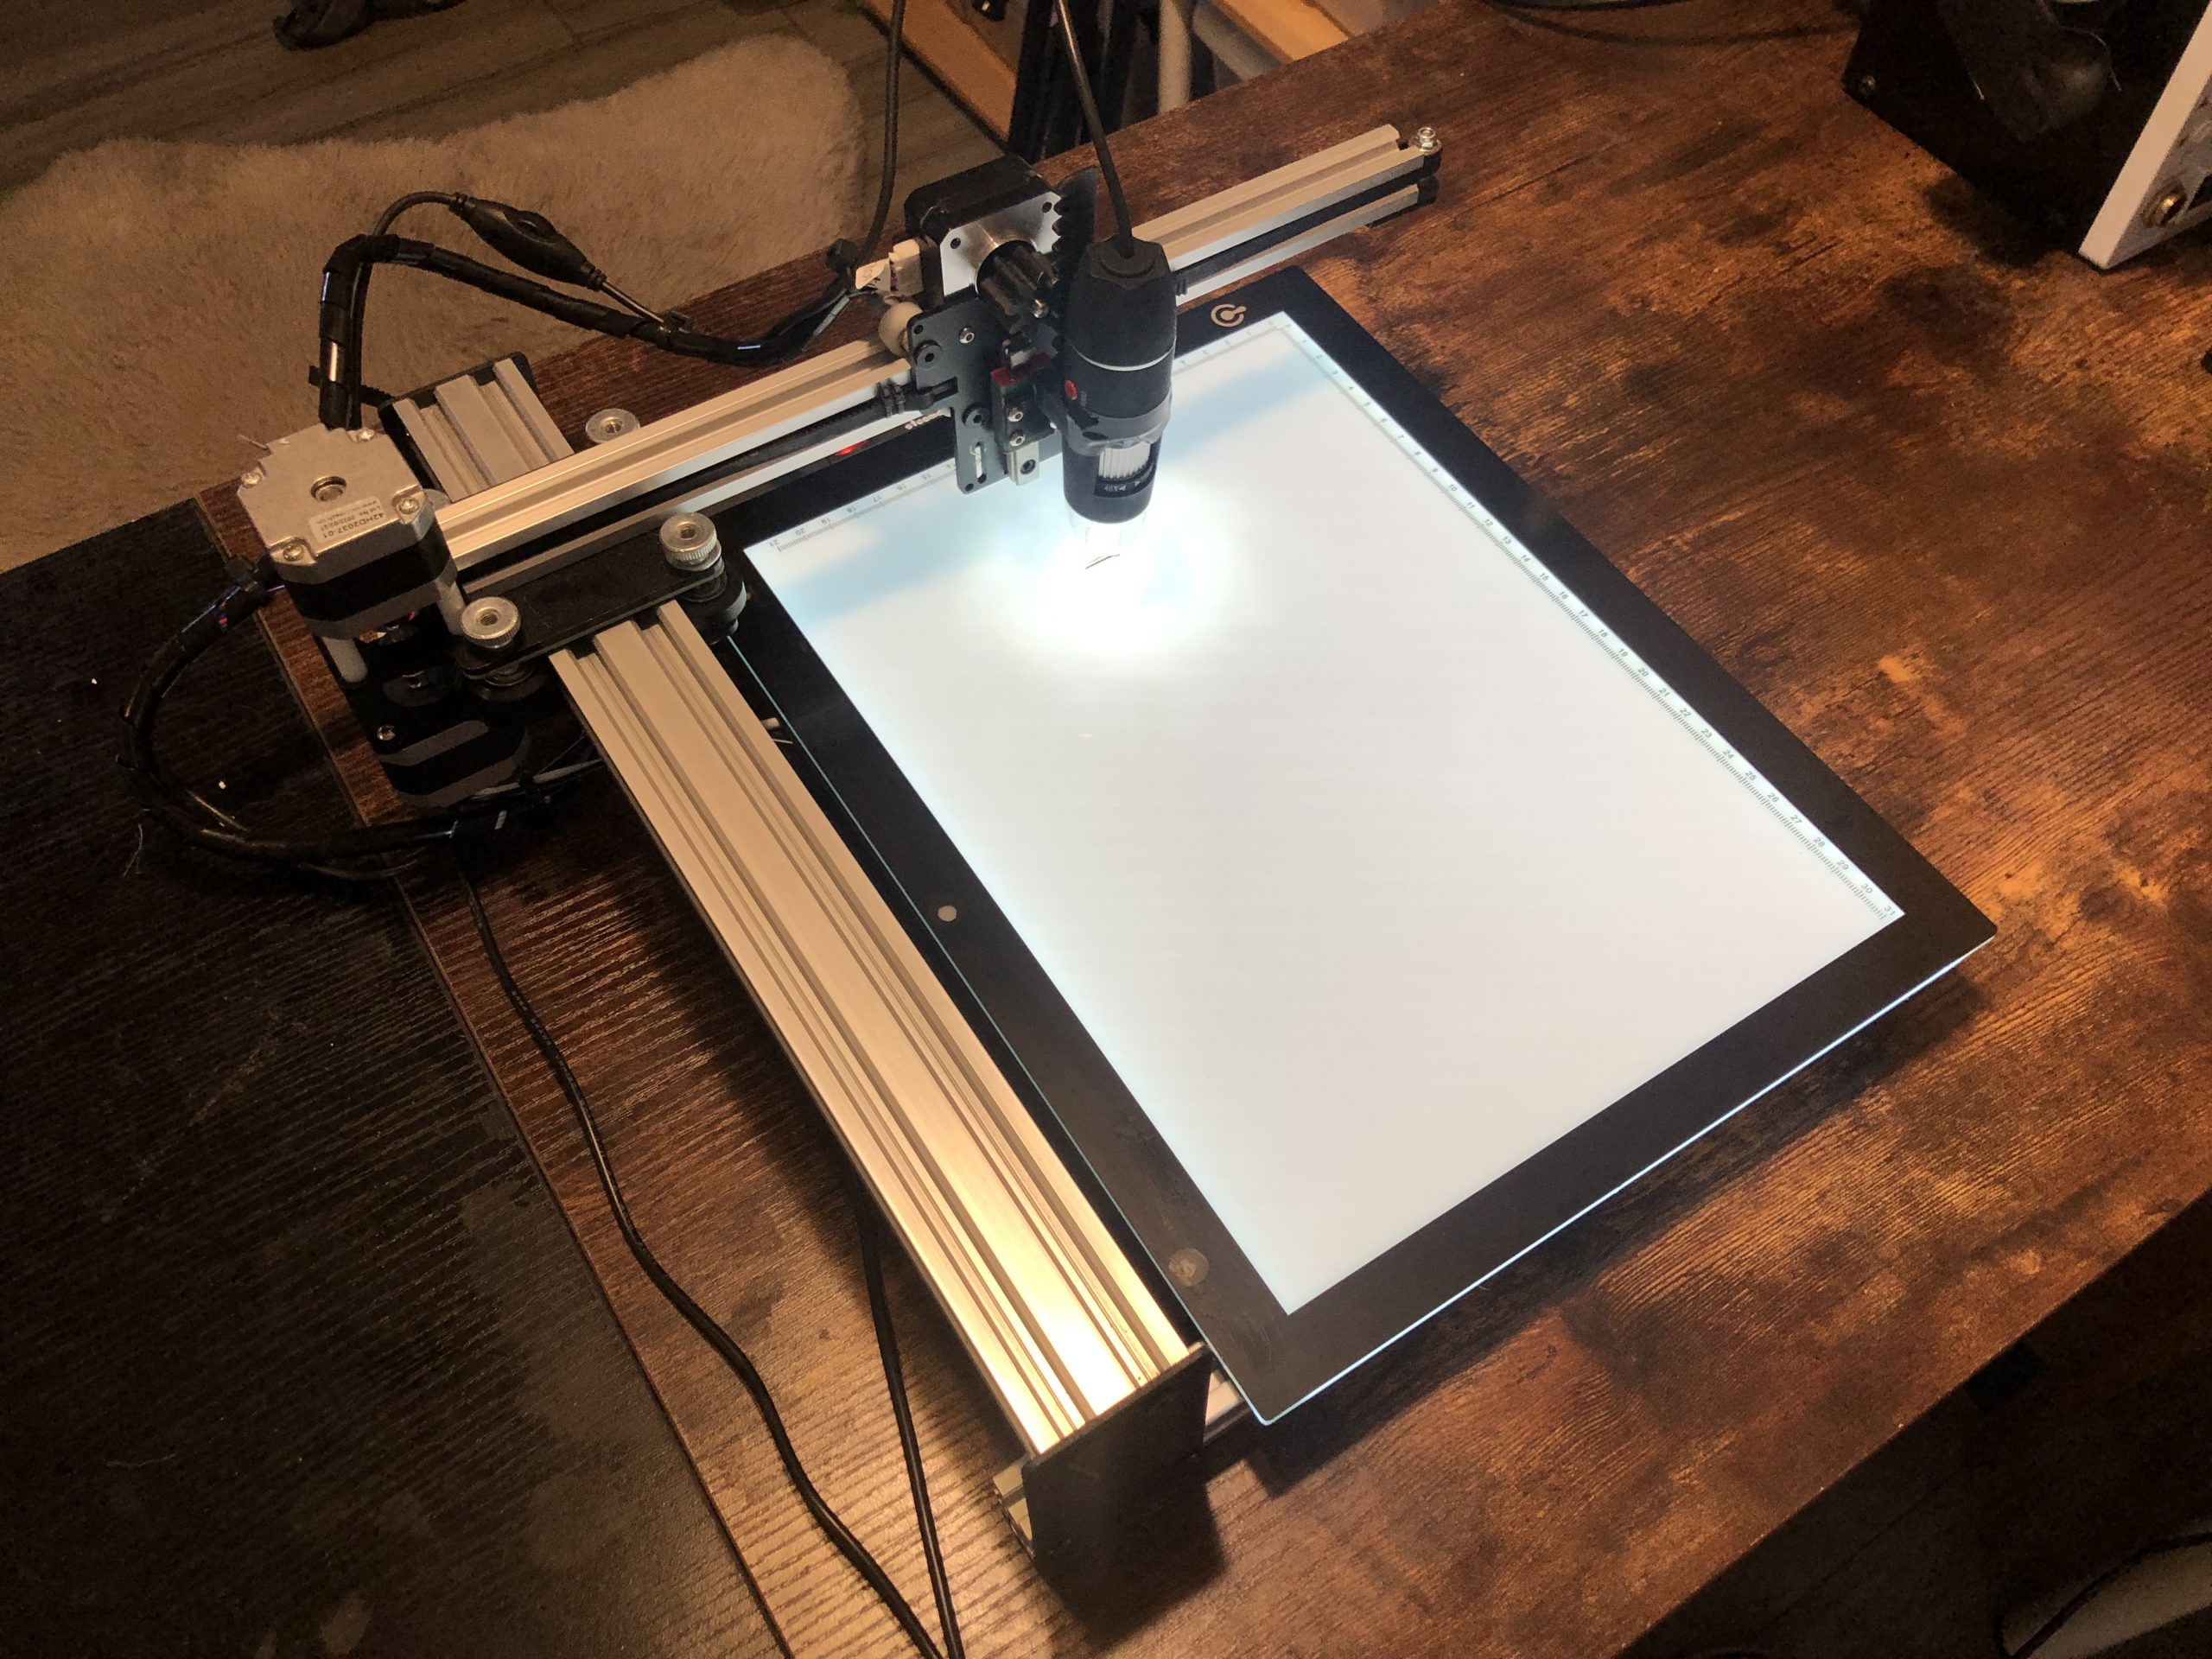
    Optical comparators are very expensive instruments (easily tens of thousands of dollars), so I decided to build an affordable version that I’m calling Comparatron.

    Demonstrating Comparatron

    Building this requires the following parts:

    iDraw Pen Plotter 2.0

    USB Microscope

    Tracing light box

    USB Hub

    Good news! The folks at iDraw liked this project so much that they’re giving everyone 15% off their pen plotters. Just go to their store (https://idrawpenplotter.com/shop) and use the coupon code “CAMERON” to get the discount.

    Building and using

    Full build instructions, 3D-printable files, and software are available on Instructables here: https://www.instructables.com/Comparatron-an-Affordable-Digital-Optical-Comparat/

    Additional information and a standalone executable version of the Python software is available on GitHub here: https://github.com/theserialhobbyist/comparatron

    But here is a basic breakdown:

    Print the two parts on any 3D printer. Then remove the iDraw Pen Plotter’s pen lift mechanism and attach the microscope mount, and press-fit the spur gear to the motor shaft.

    Connect the USB cables to your computer (a USB hub makes things easier).

    Launch the software (either the Python script or the standalone executable) on a Windows PC, connect to the pen plotter, then move the microscope over your part and start marking points.

    When you’ve marked all of your points, export the DXF file. Then import that DXF file into the CAD/design software of your choice and use the points as references for your design.

    That’s it! I think this is a very useful tool and I’m quite proud of it. If you decide to build one, please let me know!

  • Jeep Grand Cherokee WK2 Double DIN Stereo Install Parts

    Jeep Grand Cherokee WK2 Double DIN Stereo Install Parts

    I recently bought a 2011 Jeep Grand Cherokee (WK2) Laredo 4×4 w/ 5.7L Hemi. It came with the UConnect stereo, which was nice. But it didn’t have navigation and I missed Carplay. I wanted to install an aftermarket stereo, but it turned out to be pretty difficult to figure out what parts are required.

    I successfully installed mine, so I thought I’d give you all a list of all of the parts you need so you can do the same. I’m not sure which other years this works for, so you’ll want to check on that. Importantly, these parts will let you use the steering wheel control buttons, the factory backup camera, and the factory amp/subwoofer (if you have them).

    The parts:

    Stereo: I used an ATOTO A6 PF, which I like a lot. You can use other models, but I would recommend finding one that is shallow. Some info I’ve found online suggests that you need to modify that sub-dash, but I didn’t have to do much for this stereo (more on that later).

    Wiring adapter: The main adapter you need is the PAC RP4-CH11, which has a special adapter for your steering wheel controls.

    Retention harness: The AXXESS Chrysler RSE Retention Harness provides the connection for the backup camera. I believe if you have rear seat entertainment screens, it might also let you connect those to your new stereo but I don’t have those and can’t confirm.

    Antenna adapter: This Metra 40-EU10 adapter lets you connect the factory antenna cable to conventional coax antenna ports most aftermarket stereos.

    Dash install kit: I used the Metra 95-6513B, but it didn’t fit my stereo quite right and I had to trim the plastic. Another option is the AI CDK652, but I can’t confirm if that works better or not.

    Trim removal tools: You’ll need basic tools (wrenches, screwdrivers, wire strippers, etc.) for the install, but on you thing you might not have is a set of trim removal tools. These will help a lot and keep you from damaging your dash.

    The install and modifications

    I’m not going to cover the full process here (there are videos on YouTube), but I do want to give you some tips:

    The PAC RP4-CH11 will come with two harnesses (with the gray plugs) and you only need to use one of them. If your Grand Cherokee has the subwoofer in the cargo area, then you’ll need the “B” unit. If it doesn’t, then you’ll need the “A” unit. The plugs aren’t compatible, so you shouldn’t be able to accidentally plug in the wrong one.

    The PAC RP4-CH11 control unit (the blue box) has a dial to select your radio brand. This is to set the steering wheel control (SWC) buttons to the right functions. For my ATOTO stereo, I used the “other” setting. But it probably doesn’t matter, since the stereo lets you configure each button’s function in software.

    There are two cables that the antenna adapter will fit in. You want the white plug, because the yellow plug is for the satellite radio antenna.

    There is a cable with a small gray square plug that you disconnect from your stock stereo. You won’t connect that to anything on your new stereo. I believe it does something for the Uconnect. I mention this because I was confused about if it was supposed to go somewhere.

    You’ll need to remove the metal frame inside the dash. There are three bolts that hold it in place. You can get it out by twisting it around. Replace one of the bolts for your chassis ground wires.

    Some sub dash modification may be required. Online info suggests that some double-DIN stereos require substantial modification of the sub dash. But all I had to do was file down some of the plastic at the corners of the outer frame so that I could slide the new stereo.

    You may need to modify the dash install kit plastic parts. My Metra kit didn’t fit the ATOTO stereo properly and I had to trim down the side with a Dremel to get it to fit.

  • How to Modify a Curt Trailer Hitch for 3rd Gen Monteros

    How to Modify a Curt Trailer Hitch for 3rd Gen Monteros

    All of the trailer hitch options currently available for third generation Mitsubishi Monteros/Pajeros reduce ground clearance below the bumper by quite a lot. The Montero’s departure angle is already less than ideal, so making it worse with a trailer hitch is unacceptable. Still, some of us need to tow.

    Montero Modified Hitch
    Modified Curt trailer hitch for 3rd gen Monteros

    To help the situation, I modified a new Curt trailer hitch for my 3rd gen Montero. This gained me about 2.5 inches of ground clearance below the receiver tube, with the tube tucked up just below the bumper. In this guide, I’ll explain how you can perform a similar modification.

    Disclaimer: I am not responsible if you hurt yourself performing this modification, if you waste your money ruining the hitch, or if it falls apart and causes your trailer to come off and kill a family in a minivan behind you on the highway. This requires proper welding and you shouldn’t attempt it if you don’t have a lot of welding experience.

    Other people have done similar modifications, but some go about it in different ways. I chose to do what I felt was the simplest method: cutting the crossbar off of the upright mounts, then rewelding it 2.5″ higher up. This illustrates the basic idea:

    Montero trailer hitch modification

    The idea is straightforward. If you’re an experienced fabricator, you can probably figure out how to do it properly just by looking at that illustration. But I’ll go ahead and explain the whole process for people who want the full story and who want to avoid mistakes.

    Supplies

    Everything linked to above (aside from the hitch itself) is just a suggestion. If you prefer other brands, go ahead and use them.

    I won’t get into the specifics of the welding here, because I can’t teach anyone how to weld properly in a short article like this. But you should be prepared for MIG welding on mild steel. Obviously your hitch needs to handle pulling the weight of a trailer, so it needs strong welds. This is not the time to try your hand at welding for the first time! Hire a pro if you need to.

    Measurements

    Before even looking at your cut-off wheels, you need to take thorough measurements. Later, when you weld the hitch back together, you will need to reference these measurements in order to make sure the hitch will actually bolt onto your truck. If you’re off by even 1/8″ in some places, it may not fit anymore.

    A few things to note that should help:

    • The two upright supports are parallel to each other, and perpendicular to the cross bar.
    • The distance between the top of the upright supports (where the bolt holes are) to the top of the cross bar is equal on both sides.
    • The cross bar does not need to move forward or backward at all, nor does it need to tilt. It just needs to move straight up by 2.5″.

    I recommend that you take the following measurements, at bare minimum:

    • Distance between upright supports (most important)
    • Distance from top of upright supports to top of cross bar
    • Forward/backward position of cross bar on the upright supports

    It is also very helpful to use your speed square and your marker to draw guidelines before you start cutting. Those lines will be very helpful when you do your welding. If nothing else, draw vertical lines from the cross bar up.

    Cut the original welds

    Put a cut-off wheel on your angle grinder, take a deep breath, and then start cutting.

    You want to cut through the welds on the four edges at each end of the cross bar (where the red lines are in the diagram above). Do your best not to cut into the upright supports at all, as that could weaken them. Just cut the welds and through the cross bar tube as close to the upright supports as you can get.

    If you have a good angle grinder, the entire cutting process should only take 5-10 minutes. This is thick metal, but cut-off wheels will chew through anything if the angle grinder has enough power.

    After the upright supports are off, switch to flap discs and sand down the welds on the upright supports until they are nice and smooth. Also remove the paint where you will be welding.

    Smooth down the cross bar ends, as well. Try to keep the edges even, so the cross bar will be easier to weld perpendicular to the upright supports. Again, remove the paint where you will be welding.

    If you want, you can use your cut-off wheels to trim off the bottom ends of the upright supports. I didn’t do so, as they are at the outsides by the tires and don’t hang any lower than the receiver tube. But if the excess length bothers you, you can trim it off.

    Spacers

    While cutting through the welds, you will have inevitably removed some material from the cross bar, which shortened it. If you don’t compensate for that, the overall width will be too short and your bolt holes won’t line up.

    You can compensate for the shortened cross bar in one of two ways: leave a small gap when welding, or add more material.

    This is where your measurements come in. If the length of your cross bar is now more than 1/8″ shorter than the original distance measurement between upright supports, then you will need to add material. If it isn’t, then you can get away with a small gap.

    In my case, my cross bar was about 0.35″ shorter than it needed to be. So I purchased two 3/16″ thick mild steel plates to act as spacers.

    I wouldn’t recommend plates any thinner than 1/8″, though. If need be, you can use a space on one side and not the other. This will mean that your receiver tube is very slightly off center, but that shouldn’t have a negative effect (as far as I know).

    Welding

    Other than ensuring that you are getting solid welds, the most important thing here is to ensure that the upright supports are perfectly perpendicular to the cross tube and that they are the proper distance apart.

    Triple check your measurements, use your marker for positioning lines, and make good use of your speed square.

    When you’re positive that everything is lined up properly, tack weld the upright supports to your cross tube. Then measure everything again. If it is still good, then finish up your welds. Follow standard techniques to avoid heat warping. If you’re using spacers, make sure they’re solidly welded to both your cross tube and your upright supports.

    Once everything is cool, check your measurements one more time.

    Cleaning up

    As with any other welding, you can use your flap discs to clean up your welds and any spatter, if you want to. Just don’t weaken your welds by grinding them down too much.

    Then use something like degreaser or plain isopropyl alcohol to wipe the whole hitch down clean.

    Finally, use your spray paint in a few thin coats to cover any bare metal. I found that a standard gloss black enamel from Ace Hardware matched pretty well, but use whatever you prefer. You won’t be able to see it, so this is mostly for rust protection.

    Install

    After the paint dries, you can follow the standard Curt installation instructions. Yes, the bolt behind the rear AC compressor sucks. No, there isn’t any real trick to it. Just be patient.

    With this modded hitch, you will either need to remove the plastic fascia under the bumper entirely or cut an opening in it for the receiver tube. I just removed it, since I can’t think of any reason to bother keeping it.

    That’s it! Now you can tow without hurting your departure angle much. The receiver tube should hang down roughly the same amount as the exhaust pipe tip, so you this is about as good as it gets for departure angle.

    Have any tips? Maybe a better way of doing this? Comment below!

  • 3rd Gen Montero Seat Upholstery Repair Guide

    3rd Gen Montero Seat Upholstery Repair Guide

    Third generation Mitsubishi Montero/Pajero models with leather seats have a very common wear point: the left side of the driver’s seat. Every Montero I’ve seen either has a tear in that spot or has already had it repaired. Professional reupholstery will look fantastic, but costs hundreds of dollars. In this guide, I’ll explain how you can repair this common tear on a budget.

    Montero Seat
    Montero seat upholstery repair

    Supplies

    To perform this repair, you will need the following:

    For the new vinyl (or “pleather”), I recommend going to a local fabric store. Take off your headrest and bring it with you inside the store, so you can find vinyl that matches well. You can order vinyl online, but you’ll spend more money and it will be much harder to find a good match.

    Buy a lot more vinyl than you actually need. If it comes in yard-wide rolls, then buy at least a foot in length. This will give you lots of material to work with if you mess things up and should still cost less than $10.

    Preparation

    As you can see in the photos, I did my repair with the seat out of the vehicle. I did that because I bought an entirely new seat from a pick-and-pull junk yard and hadn’t yet installed it. You do not need to remove your seat to do this, though it may make it slightly easier to work with. If you do remove the seat, it is just four bolts/nuts and the power seat connections holding it in place.

    Start by using a diluted degreaser and a clean towel to thoroughly clean the upholstery around the tear. You need to remove all of the dirt and grime in order for the vinyl adhesive to stick well later.

    If there is any lose, crumbling foam padding, then you should remove the bits that are coming off. The idea is to get a clean starting point.

    Cut a clean rectangle around the tear, then remove lose/crumbling foam.

    In that same vein, use your scissors or knife to cut a rectangle around the tear. You want straight, clean edges instead of the jagged natural tear. Don’t remove more material than necessary. Just enough that you have a straight-edged rectangle.

    The repair

    Using your new vinyl material, cut two rectangles of material. The first (inner) rectangle should be about an inch larger than the opening on the seat, on all sides. That inch will give you plenty of surface area for the glue.

    Your second (outer) rectangle of new material will probably be a little larger than that. This is what will be visible, so try to make it so the edges will line up with seams in the original upholstery. As you can see, my outer rectangle isn’t actually a rectangle at all. The bottom edge has a substantial curve to it. That was to hide the edges as much as possible.

    Get your glue ready, then carefully put the inner rectangle inside the seat (under the original upholstery). Smooth it out as much as you can, so it isn’t bunching up. Then apply glue to that inch overlap. You don’t need a lot of glue, but enough that the whole overlapping surface gets coverage.

    While the glue is still wet, adjust the new material placement if necessary. Avoid getting any glue on the outer surfaces of the upholstery. Give the glue 20-30 minutes to set.

    After gluing the new inner vinyl in place, make sure your new outer vinyl will line up well

    Double-check to make sure your outer patch material will lay nicely, then cover its back side with a thin layer of glue. Immediately place the patch over both the original upholstery and the new inner material. As the glue dries, smooth out the outer patch so there are no wrinkles.

    Make sure all edges of the new vinyl are firmly glued down. Excess glue won’t be very visible after drying, but try to keep it to a minimum.

    When that glue dries, go back and makes sure all of the edges of the outer patch are flush and that you don’t have any edges pulling up. If you do, use a small amount of glue to keep the outer edges done.

    That’s it!

    Finished upholstery repair

    As you can see, mine turned out pretty well. It is visible, but it is only noticeable if you are looking for it. Even when you do see it, it looks decent.

    I’ve had mine done for a few weeks now and haven’t noticed any issues. It hasn’t peeled or anything.

    This is a cheap repair, but it still looks a million times better than a tear with foam visible.

  • Multi-Material Resin 3D Printing Tutorial

    Multi-Material Resin 3D Printing Tutorial

    I recently wrote a how-to guide on multi-color resin 3D printing. As soon as I saw that that technique was a success, I knew I wanted to try it with different material types as well.

    There are several kinds of photosensitive resin available for 3D printing, which mimic different kinds of engineering plastics. For instance, you might have seen some labeled as “ABS-like.” But for this proof of concept, I wanted wildly different kinds of resins, so I chose a flexible resin and a standard rigid resin.

    Supplies

    You can use pretty much any rigid resin you like, but the stuff linked above is what I used here. There aren’t as many flexible resin options on the market. Siraya Tech’s Tenacious is probably the most well-known, but I used 3DMaterials’ SuperFast SuperFlex resin and was very impressed with it. It printed well on my ELEGOO Saturn 2 and was quite flexible.

    The idea

    As with the multi-color resin 3D printing technique, the idea here is to print an object in your primary material first. In my case, that was the flexible resin. That object should have modeled-in cavities that you can then fill with your secondary resin (the rigid resin).

    When you shine a 405nm UV flashlight on the liquid resin you just poured in, it will cure and harden. It will also fuse to the original print. Theoretically, you could fill several different cavities with different resin colors and materials. The result is a multi-material print.

    Multi-material resin 3D printing
    Multi-material resin 3D printing

    Obviously, this does have some restrictions. Namely, your model needs to have accessible cavities for your secondary resin. This will limit the geometry you can print, but I think this technique could still be very useful.

    The steps

    My original guide on multi-color resin 3D printing goes into far more detail on each step, but I’ll cover the basics again here.

    First, print your object using flexible filament.

    Then, using a blunt syringe, fill the cavities with your rigid filament.

    Use the UV flashlight to cure the new resin.

    Refill and cure again until the cavities are full.

    That’s it!

  • How to: Multi-Color Resin 3D Printing

    How to: Multi-Color Resin 3D Printing

    With filament-based 3D printing, you can get multiple colors with additional extruders, manually swapping filament, or with something like a Mosaic Palette device. But one of the disadvantages of resin 3D printing is that it is very difficult to change colors during a print.

    In this article, I’ll walk you through a technique that lets you get multiple colors in a resin print and that is easy to do. Redditor u/ChinchillaWafers suggested this technique in this post and I decided to give it a try. It worked quite well, so I’m sharing it with you all.

    Supplies

    To do this, you’ll need the following supplies in addition to your printer:

    You can use as many resin colors as you like, but I suggest using colors that contrast well. Gray on white, for example, won’t show up very well. But black on white will.

    The idea

    The idea here is to leave debossed letters or other spaces in your printed model, such as text inset into a surface. You can then fill those with your contrasting liquid resin and use the UV flashlight to cure it.

    A 405nm UV flashlight will cure liquid resin just like your MSLA resin 3D printer does. Other UV wavelengths might work, but these resins are meant to cure with 405nm, so it is best to stick to that.

    Because you’re pouring liquid resin into cavities in your print, you need to make sure you model can be physically oriented so that those cavities are level. Otherwise, it will be hard to keep the resin from spilling over the edges before it cures and hardens.

    The steps

    Step 1:

    Start by printing your model like you normally would. For my test, I printed a simple sign with debossed lettering that says “Cameron & Maria” (me and my girlfriend). I printed this in white so that most other colors would contrast well.

    Step 2:

    Remove supports, then rinse and cure your part. You can also finish curing the part after adding the contrasting resin, but I chose to cure it first since I would be handling the part.

    Step 3:

    After putting on gloves, choose a contrasting resin color (or multiple colors) and pour it into a small, disposable container. Paint cups work well for this. You could try to pull the resin directly from the bottle, but it would be difficult to reach your syringe inside.

    Step 4:

    Make sure your print is level, then carefully fill a syringe with contrasting resin. Try to pick a syringe needle size that is a bit smaller than the smallest portion of the debossed letters.

    Then very slowly squeeze the syringe to fill your letters with the contrasting resin. You can either do all of your letters at once or do them one at a time (curing each before starting the next).

    I recommend doing them all at once in order to avoid yellowing the original print with too much UV exposure. You can see at the top left (by the “C”) that I made that mistake when I first started.

    Step 5:

    If any resin spilled over the edges, use an paper towel wetted with IPA to wipe it away. Try not to soak up the resin inside the lettering.

    Step 6:

    Turn on your UV flashlight and shine it over the lettering to cure the new resin. Depending on the depth of the lettering (mine was 2mm), curing can take anywhere from 3-15 seconds.

    Safety warning: 405nm UV light is bad for you! Avoid shining it at anything living, especially your eyes! Seriously, I take no responsibility if you blind yourself or develop skin cancer.

    Step 7:

    Repeat steps 4-6 until your letters are completely filled in. If you end up with spilled-over resin that cured, you can lightly sand the surface to remove it.

    Admire your work

    And that’s it, you’re done! This is an easy, affordable way to add more color to your resin prints. It works especially well for debossed lettering, so I will almost certainly use it in the future for projects where I want to add a name/logo to enclosures.

    Multi-color resin 3D printing

    It seems like it might also be possible to mix materials, such as a flexible resin with a rigid resin. I’m hoping to experiment with that in the future.

  • What You Need for Your First Motorcycle Trackday

    What You Need for Your First Motorcycle Trackday

    While I’ve been riding motorcycles for more than 16 years now, I didn’t go to the track until I bought my Daytona 675 this year. A big part of the reason that I waited so long was that it seemed intimidating. I was overwhelmed by what I needed to do and buy, which held me back.

    Now that I have a couple of trackdays under my belt, I know that it is actually pretty easy to get started. To help others get on the track, I want to explain what you need for your first motorcycle trackday.

    Bike prep

    This should be obvious, but you should make sure your bike is well-maintained and in good working order before you do anything else. Your trackday organizers will inspect your bike and they won’t let you on the track if there is anything wrong with your bike. Things to check include:

    • Fork seals are clean and not leaking
    • Chain and sprockets are clean, lubed properly, and not overly worn
    • Foot pegs are secure and pivot properly (if applicable)
    • Throttle closes smoothly and easily
    • Brake and clutch levers operate properly and cables aren’t loose
    • Shifter moves freely
    • Brake pedal has proper resistance and doesn’t bind

    Your suspension and tires should also be in good shape. If you are in need of new tires or need your suspension setup for your weight, there should be techs at the track who can do the work at competitive rates. It cost me $40 to have a tech setup my suspension at the track and tire prices were the same (or better) than at local shops. The techs can also recommend tire pressures for your bike and the current conditions.

    Assuming that your bike is in good shape, there are only a few things you need to do before you get on the track. These vary by track and trackday organization, but usually you need to:

    • Cover all lights with blue painters tape
    • Either remove mirrors or cover the glass in painters tape
    • Install a dB killer for your exhaust, if necessary

    Many tracks have decibel limits and your exhaust can’t exceed those limits. Even popular aftermarket slip-ons can be too loud. Unless you have a stock exhaust, there you may need to install a dB killer to stay below the limit.

    Some exhaust manufacturers sell dB killers/baffles specifically for their products, which should be your first choice. If those aren’t available for your exhaust, you can try a universal dB killer like this one.

    Riding gear

    Every respectable trackday organization will have gear requirements. Your textile jacket for street riding will not cut it. At the very least, you will need:

    • A DOT-approved helmet
    • Riding suit (leathers)
    • Over-the-ankle riding boots
    • Gauntlet gloves

    Riding suits can be made from a variety of leather types, including cow hide, kangaroo hide, and goat hide. Cow hide is always acceptable, but the others may not be (check with your organization). Similarly, a one-piece suit is always acceptable, but a two-piece may or may not be. If you are going to buy a two-piece suit, make sure the top zips onto the bottom.

    Your suit may come with knee pucks (sliders) and a back protector, or you may need to order them separately. Whether or not they’re required will depend on the organization, but you should buy them either way.

    Wearing my inexpensive Bogotto Losail riding suit

    Suits can be very expensive and that cost tends to be what keeps people from going to the track. But a riding suit will literally save your skin and decent suit will last for years. I ordered my suit (a Bogotto Losail) from FC-Moto in Germany for around $300, which is about the cheapest suit on the market. But it is still cowhide and seems to be constructed well.

    And whether you’re in cold weather or hot weather, base layers will increase your comfort. Under Armor-style leggings and shirts are great at wicking away sweat and keeping your from sticking to your leathers. The cheap brands are generally just as good as the expensive brands, so there is no need to spend a lot of money.

    Tools and supplies

    To be on the safe side, you should bring a basic set of tools with you. Those should include ratchets and sockets, hex wrenches, pliers, and so on. You don’t need to bring your entire garage with you, but you want to be able to handle basic tasks if they come up.

    You will also want to bring an air compressor and some means to power it. I use this air compressor that plugs into my car’s cigarette outlet. With this, I can inflate or deflate the tires to maintain the pressures recommended by the techs. Keep in mind that your tire pressures will change throughout the day as it gets hotter.

    Depending on the track and the size of your bike’s gas tank, you might also need to bring a jerry can full of fuel. My Daytona 675 has a relatively large tank that lasts the entire day, but I have friends who need to refuel multiple times during the day.

    Shade and comfort

    You’re only going to be on the track for a fraction of each hour. The rest of the time, you will want somewhere comfortable to rest. The track might not have any amenities aside from some porta-johns, so you will want to bring a few things. This is especially true if you’re somewhere hot, like I am in Arizona.

    The most important thing is some shade. I use an E-Z Up Ambassador portable canopy. It’s heavy, but provides 10×10 feet of shade and is quick to setup/breakdown. To keep it from blowing away in the wind, you’ll want some sandbags to put on the feet. I just bought some bags and sand at my local Ace Hardware.

    Bring your own shade, because the track may not have any!

    You’ll also want something to sit on in the shade. Regular old collapsing camping chairs work just fine for me.

    It’s optional, but you might want a folding table on which to place your helmet, gloves, etc. between track sessions.

    Finally if you want some real comfort, you might consider a portable swamp cooler (with generator for power). I have friends who brought one to our most recent trackday and it really helped with the 105°F+ heat.

    Hydration and food

    I can not stress enough how important hydration is at the track. However much you think you’ll drink, double or triple it. I’m talking about gallons of water and/or sports drinks. Even if you aren’t in hot a desert like I am, the physical exertion of riding hard while in leathers will drain you.

    You should start hydrating several days before you go to the track. Avoid booze and drink as much water as you can stand each day.

    Then bring as much fluid as you can with you to the track. A few bottles of Gatorade will not be enough. I would recommend a few gallons of water for each person, at a minimum. You can buy electrolyte packets to mix in with your water (I use Liquid I.V.), which can help a lot. Make sure you have a cooler and ice to keep your water from getting hot.

    You will also want food for the track. While you might not have much of an appetite, you should have lunch and snacks ready. Bananas are great, as the potassium can help with cramps. Sugary candy can also help to keep your blood sugar up.

    Getting your bike to the track

    You can simply ride your bike to the track, but not many people do. That would make it very difficult to bring everything mentioned above. I can also guarantee that the last thing you’ll want to do after a long, hot day at the track is hope back on your bike for a ride home.

    For those reasons, you’ll probably want to tow your bike to the track. In the United States, U-Haul is a great place to rent motorcycle trailers. It usually costs me about $35 for a two-day rental, which lets me load the bike up the day before the trackday and then return the trailer the day after.

    My Daytona 675 ready to go to the track

    Just about any vehicle can pull those trailers. I tow with a 2019 Toyota Rav4 that has a towing capacity of 1,500 pounds and don’t have any issues. Just make sure you have an appropriately-rated hitch, a 2″ ball, and a 4-pin trailing wiring harness.

    The trailer will not come with any straps to secure the bike, however. The best method for tying down the bike will depend on the model/style. For a fully-faired super sport like my Daytona 675, I would recommend two heavy ratchet straps, two cam-lock straps or ratchet straps, and two “softloops.” This kit on Amazon has everything you’ll need.

    The two softloops can go around your handlebar grips. On each side, a ratchet strap should go from the softloop to the D-ring on the trailer. At the back of the bike, use a ratchet strap or cam-lock strap on each side from the passenger peg mount to the D-ring on the trailer.

    If you’re unfamiliar with tying a bike down to a trailer, check out this video that covers the basic concept:

    And that’s it! If you follow those steps, you should be well-prepared for your first trackday. Have any additional questions or tips you want to share? Comment below!